Some of the standard weapons in Dead Rising 4 will do a fine job of taking it out any zombie that comes your way, but the game offers a lot more when it comes to the arsenal it offers. There are many weapon blueprints that are scattered throughout the game’s world, and once you find them you will be able to combine two certain weapons to create one devastating zombie killer. Some of these are trickier to find than others, so this guide will help you track down every last one.
Blast from the Past: The first blueprint that the game has to offer is hard to miss, as it is located at the beginning of the prologue mission. On your way to the military facility you will spot the blueprint on a crate against the room that is overflowing with zombies on the other side.
Froztee Penguin: You’ll be able to find this blueprint after the helicopter crash in the first mission, with the blueprint being in a locker inside of Froztee’s Frozen Yogurt shop. However, you will need to make sure that you have Froztee’s locker key, which you will be able to find at the bar near The Thirsty Amazon.
Electric Wreath: This blueprint is located inside of Rhiannon Ferosh at the Miami Boardwalk section of Willamette mall. The blueprint will be waiting for you inside a locker.
Acid Maul: This blueprint is located in the Medieval Town Museum, which can be found to the left of the entrance of Medieval Town. The blueprint will be sitting on a table that also has a crossbow.
Flaming Helmet: Head for the Amazon Food Court to the Medieval Town for the next blueprint, which is located inside of the Toy Rex shop. You’ll spot the blueprint sitting on the counter.
Floating Lantern: The next blueprint can be found in Oh-San’s Sun & Moon Sushi, which is located in Kiichiro Plaza. The blueprint is waiting for you on the counter.
Santa Trap: To get this blueprint you will have to first gain access to the panic room in the central plaza of Santa’s Village. You will need to find the Zom-B safe key, which you will find on Santa’s chair. Once you’re inside the panic room you will spot the blueprint on a bed.
Laser Sword: You can find this blueprint in the Charms of Desire shop, which you’ll find in between the boulevard connecting Caribbean Cove and Miami Boardwalk. You’ll find it on top of a box.
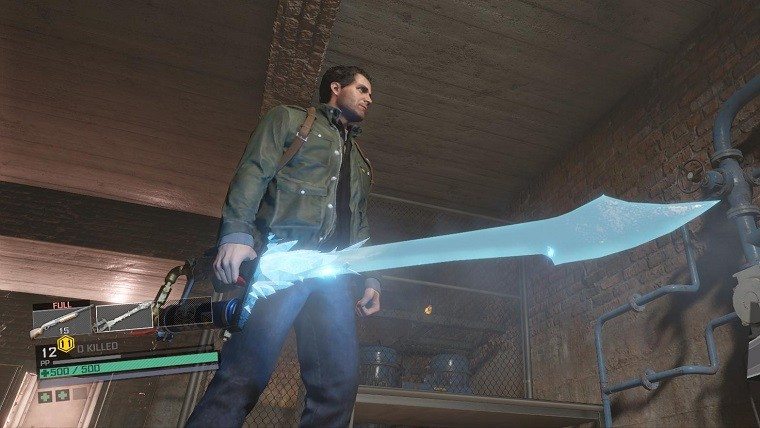
Ice Sword: Finding this blueprint can be done by going to Old Town and heading for the apartment located above Dodd’s Drugs. It will be located on the kitchen counter near plates and alcohol.
Flaming Sword: Go to the park at the northwestern corner of Old Town and look for the structure in the middle of it. Once there, take out your Spectrum Analyzer and scan the ground for a spot to dig. Find an Exo Suit at the nearby Gazebo, then come back and dig the hole to get the blueprint.
Slicing Beauty: This blueprint is found during the part in case 1 where you need to take down a group of Obscuris soldiers that are near several small buildings. Once you’ve taken them out, head inside of the tent to find the Obscuris Locker Key. After that, go to the door with the keypad and find the locker inside that holds the blueprint.
Holiday Junk: In order to get this blueprint you will need to be made aware of the Maniac Sadistic Claus, which is located in southern Old Town near the Willamette Bus Stop. You will find the blueprint sitting on Santa’s chair in a tree plot, but be warned that you’ll have to take down Sadistic Claus in a boss fight.
Roaring Thunder: Tetro’s Comics & Collectibles in Old Town will be the home of this blueprint, which will be on the counter.
Glass Knuckles: Acquiring this blueprint is done by purchasing it from the vendor at the emergency shelter in West Ridge. It costs $6,000.
Roto Killer: You’ll find this blueprint in the northern section of Old Town, which will be lying on the ground near a table.
Bon Bomb: This blueprint will be found during the story mission leading to West Ridge. Once you arrive you will find the blueprint on a table against a wall.
Magic Wand: Head for the southeastern section of the emergency shelter in West Ridge, and head inside of the Brieder house to find the blueprint on the table in the living room.
Gandelf: The next blueprint can be found in The Gardener’s house on the eastern side of West Ridge. You’ll first need to grab the key from the master bedroom, with the blueprint being inside a locker.
Back Cracker: This blueprint is located at the top of North Peak in Nickolls Ink, where you’ll find it on a table near a window.
Sledge Saw: Head for the middle of Willamette Jr. High School and use the Spectrum Analyzer on the ground to find a dig spot. Then go find an Exo Suit to the south of the school and come back with it to dig up the blueprint.
Sentry Kittens: Use your Spectrum Analyzer to spot a dig site near a dam heading towards North Peak. There is an Exo Suit that can be found near some nearby trucks, so go and get it then come back to dig up the blueprint.
Jurassic Barf: You can find this blueprint at the top of North Peak in the Peak Motel. You’ll spot the blueprint on a table below a television.
Deck the Halls: Go to the Jox Family house in the Mountain Ridge Estate in West Ridge, where you’ll find the blueprint on the kitchen counter. If you can’t get inside of the gated community then you need to progress the story to case 3.
Blambow: This blueprint is found near the beginning of the game after you crash at Willamette mall. Once you reach the hotel foyer you will find the blueprint on the ground in front of Connor.
Ornament Gun: Mad Love Tees is the spot where you’ll find this blueprint, which is right near the entrance of Medieval Town. The blueprint is sitting on the counter.
Umbrella Gun: Go to the elevators on the first level of the Amazon Food Court and use your Spectrum Analyzer to find the panic room. The blueprint is waiting inside on top of a bed.
Fish Launcher: This blueprint can be found at Caribbean Cove inside of Pirate’s Catch Restaurant, which is inside of a locker. You can find the keys at the top of the nearby yellow clock tower.
Holey Terror: You’ll find this blueprint during case 2 at the Old Town Fire Hall, which is located on a table in the kitchen.
Ice Chain Gun: You can find this blueprint in the southeastern portion of West Ridge inside of The Quizeen’s house. You’ll spot the blueprint on the kitchen counter.
Raining Nails: Head for Big Buck Hardware, but before you go inside go to the corner of the street and look behind the dumpster for a key. Take the key inside the store and use it on the locker to grab this blueprint.
Split Shot: Go to the bottom of Old Town to the Willamette City Hall Archives and use the Spectrum Analyzer on the ground near sandbags to reveal a dig spot. Grab the nearby Exo Suit to dig up the blueprint.
Hit Maker: Go to the southeastern section of West Ridge and head inside of the Muzak’s house. You’ll find the blueprint on a table near the front door.
Laser Slicer: This blueprint can be bought from the weapons vendor in the North Peak emergency shelter. It costs $6,000.
Nut Blaster: The western portion of West Ridge contains the Patriot’s home, which contains a panic room holding the blueprint. You can find the key in the garage of the emergency shelter. Once you have it, head for the trapdoor in their yard to unlock the panic room. The blueprint is inside on a bed.
Ion Cannon: Gruff ‘n Tuff Motors in North Peak near the emergency shelter holds the next blueprint, which is on the counter.
Plunger Lure: You can buy this blueprint from the weapons vendor at the emergency shelter at Willamette mall. It costs $6,000.
Chuck ‘n Chop: This blueprint can be bought from the weapons vendor in the Old Town emergency shelter. It costs $6,000.
Suckmaster 3000: Go to The Mekanicks’ shed in West Ridge to find this blueprint, which is located to the southeast of the emergency shelter. The key can be found in the garage, which you’ll then need to take to the trapdoor in the shed leading to the panic room.
DIY Grenade: Head for North Peak and go northwest to reach Shanky’s Pool Hall. The blueprint will be sitting on top of the bar.
Sticky Bomb: North Peak’s McKenzie Auto is where this blueprint is located. You’ll first need to grab the Zom-B key from a table, and then use the key on a nearby keypad. This will cause the panic room to open, which holds the McKenzie Auto Locker Key. Take it back to the main area and use it on the locker for this blueprint.
Soundwave Trap: You’ll find this blueprint at WLD Country Radio 530 AM, which is north of the emergency shelter in North Peak. You’ll find the blueprint on the counter.
We’re still working on finding the last handful of blueprints in the game, though check back soon for when they are added in. Even better, if you happen to know where something is that we missed, then let us know in the comments below!