The Godskin Duo is a boss found in the Crumbling Farum Azula in Elden Ring. This late-game area is one of the toughest challenges you’ll face in Elden Ring, and the multi-enemy, multi-stage boss fight can be a bit daunting for certain character types. In this guide we’re going to give some tips for beating the Godskin Duo in Elden Ring.
How to Beat the Godskin Duo (Melee Solo)
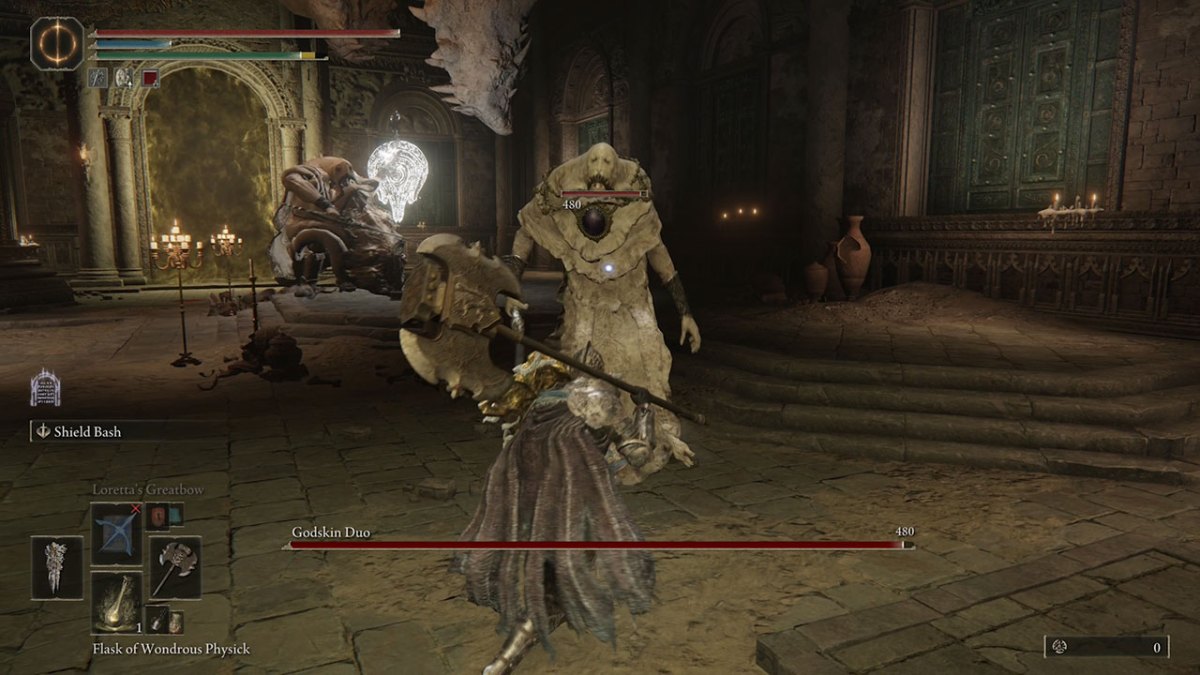
If you’re a melee character, the Godskin Duo is going to be a tough boss fight. Both enemies are incredibly fast, despite their appearances both enemies can kill you and constantly attack in tandem. The key to beating this boss as a melee character is to use the barriers in the room to your advantage to split up the duo and get your shots in while the other can’t hit you.
Each of the bosses will transition to a second form when you get them down to around half health. If you kill one of the duo, you can fight the other one solo, but only for a short window at which point they will spawn again. YOU CANNOT, kill them in one round if you get both to zero. You have to take down the entire life bar of the boss to win the fight. However, there are some ways to do this more easily.
In this fight, as a melee character you’re going to want to be blocking more than rolling, and always trying to position the two where you can see both of them. While this will prove to be a tough task, you most certainly should try to pick up on the audio queues. Each of the duo has a holy fireball that they’ll throw at you, and you can always hear it coming. The tall guy’s fireball is slightly faster than the big guy. When you hear the audio queue you’ll want to be dodging as if the fireball hits you it’s instant damage.
The big guy also has a thrusting attack which can hit you from distance, but it also has an audio queue that can help you get out of the way or block the attack. The good part about this fight is that you can block almost all of the hits from the duo, but they are relentless and will quickly drop even high level character’s stamina, stun you, and most certainly kill you at that point.
Back to getting them down to each half health. Choose to isolate one of these bosses at a time, you’ll want to get one of them down to half health and the other to almost half health. You can do either but we generally chose to get the tall guy down to half health first. Once they transition you will have new attack patterns to worry about. Both will do an AOE attack when they transition so while they are stationary the most you should try to get in is a hit or two and be ready to dodge the explosive attack. Regardless of who you get to half health first, they’ll most likely start knocking down the cover that was keeping you alive previously.
Tall Guy Second Phase

The Tall Guy in the second phase has numerous attacks to deal with that are different than before. He has two powerful magic attacks, one which has area of effect and the other where he’ll twirl around aflame. If you can decipher which one is the area of effect attack and which one is the twirling melee, you can roll in on the twirling melee attack and get at least a hit or two in on him. That is of course, if the big guy isn’t prepping an attack of his own. This fight is all about taking what they will give you and not just trying to hit them everytime there’s a perceived opening because those openings close quickly.
Tall Guy has two other melee attacks, one where he’ll spin his sickle and the second is a looping circle of a melee attack. Both of these can be dodged quite easily. If it’s the spinning sickle attack roll towards the boss and through the spinning attack. If the big guy isn’t waiting with a fireball or thurst, take the opening and go for two attacks. Same goes for the looping attack. These attacks are his most common in this stage so if the big guy isn’t within distance or isn’t winding up a fireball attack make sure to get your hits in. Make sure to be blocking once you get inside for the quick counters he has and wait for the next opening. These special attacks are peppered in with his standard attacks, so anything you could hit him with in the first stage you can basically do the same in the second, the easiest openings are rolling towards him when he jumps or use the sickle to pull you towards him.
Taking advantage of the attack patterns it shouldn’t take long to get him down to zero health. After he disappears you’ll have the big guy all to yourself. Since you’ve already got him down to half health, a hit or two should send him into his second phase as well.
Big Guy Second Phase

The second phase of the Big Guy is going to have one key thing you need to remember and that’s if he starts rolling you need to get behind cover or behind what used to be cover. The rolling attack that he’ll do will almost always be stopped by the monuments if you can get the proper spacing before the attack. He’ll continually roll into the base of the statues and you can likely get a couple of hits in by standing on top of the rubble. Aside from that he has a large area of effect attack and a very fast thrusting attack, both of which are easily avoided. While in the first phase it’s pretty easy to get in close on the big guy, he’ll do an AOE attack in the second phase if you’re too close, so it’s one hit and back off if he’s doing anything but rolling in phase two.
However, if you are fighting him alone as the Tall Guy is gone at the moment, you won’t have long to fight him before he pauses to call his buddy back. When he does, Attack! This window will allow you to take him down a lot of health in a short period of time. You can get 4 hits at least in if you start hitting him as soon as he starts the call. Both characters will raise their hands over their heads to call the other back, at which point they will spawn in at what seems to be a random area.
You can take the big guy down in this window if you’re fast. If you do, you’ll be back to square one with the duo. Likely without the cover that you had before. But the attack patterns are exactly as they were when you started the fight. Telegraphed fireballs and nothing too crazy. At that point it’s simply about repeating the process, but without the cover you had at the start of the fight. With no cover, it’s easiest to take advantage of two attacks and look for an opening. The Tall Guy’s jumping attacks, roll in and get a hit or two and then back off to get them down to half health OR the thrust for the big guy. Either way, this second form encounter should be a little tougher with no cover, but everything roughly works the same way.
Upon killing one of them, you’re going to want to really press in the window where you have one of them isolated and that should put an end to the Godskin Duo.


Published: Feb 26, 2022 02:26 pm