If you are looking to get overpowered in the early stages of Elden Ring to start your adventure right, you will need to follow this guide to get all the gear you need to not just survive, but thrive, in the Lands Between. A lot of players struggle early with some of the difficult bosses. If you follow this starter route, you will get some overpowered gear in less than 15 minutes.
The Starter Route That Gets You OP Gear in 15 Minutes in Elden Ring
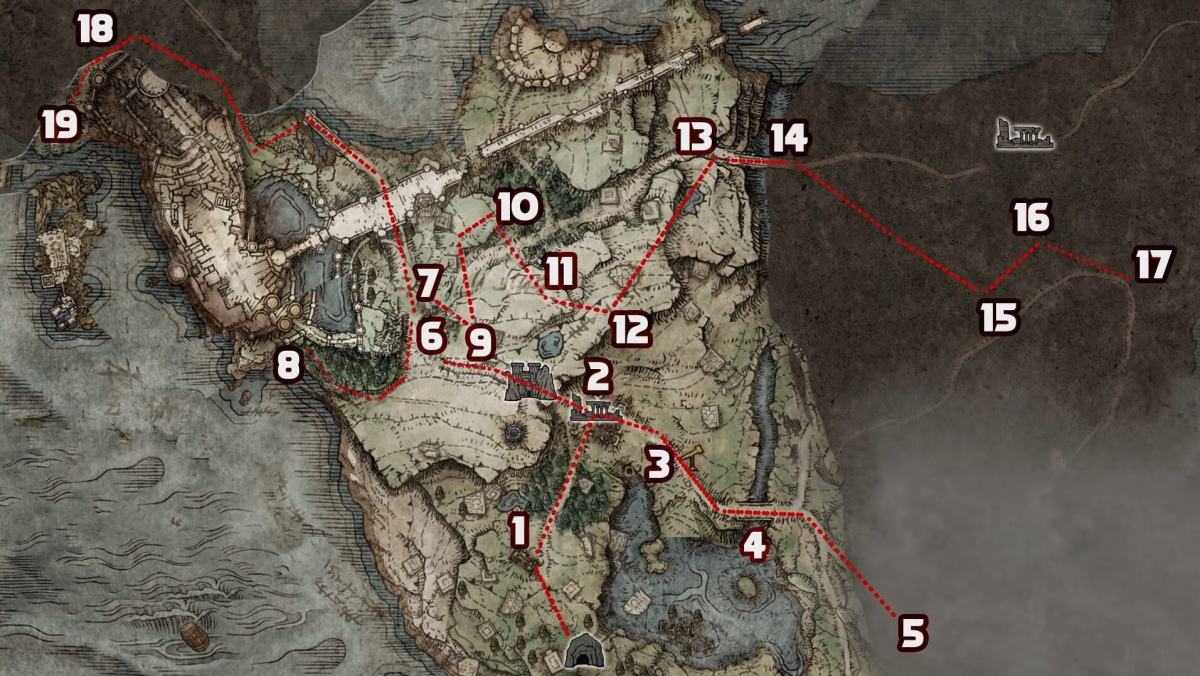
Courtesy of Boomstick Gaming on YouTube, this route will include a strong +4 weapon, improved armor regardless of what class you chose, double the healing effects from your Flask of Crimson Tears, a strong spirit companion, a ton of Runes to spend on your character to level up, and access to several important features in the game early. You can see the full video below or keep reading on for step-by-step instructions for the route.
Steps 1-3: Runes, Smithing Stone, and Torrent
First, head towards the church to get some early Runes and a smithing stone. Then head northeast towards the Gatefront Ruins where you will find the area’s map. Once you pick that up, turn right and get to the Lost Gravesite where you will get your Spectral Steed Whistle from your Maiden.

Steps 4-6: Another Smithing Stone and More Runes
Second, head southeast towards a big stone bridge and grab the smithing stone on the bridge. Go southeast even farther and look out for the pointed triangle structure from a demolished building. Behind that area includes a collection of tombs that have Runes on them. Head back to the Lost Gravesite you found in the first part of the tutorial.

Steps 6-8: Golden Seed, Stonesword Key, Jellyfish Ashes, and A Third Smithing Stone
Third, you will be heading northwest through the big gate into Stormhill. Be sure to grab the Golden Seed next to the golden tree once you enter this area. Go directly north and rest at the Lost Gravesite next to the abandoned building. Jump up the platforms next to the site to get a Stonesword Key.
Head into the abandoned building to talk to the woman with the red hood several times to get the Spirit Jellyfish Ashes. Go to the forest southwest of the gravesite and go around the large stone wall on the right until you hit the hidden area. It will be full of jellyfish floating above a collection of tombstones. Go into that area to grab another smithing stone. Go back to the Stormhill Shack from there.

Steps 9-13: Even More Smithing Stones, More Runes, and a Crystal Tear
Fourth, go southeast behind the shack to find three smithing stones behind a man in a chair. Head north from there until you hit a cliff with a giant on it. You will find the Strength-knot Crystal Tear there. Go south until you find another collection of tombs for Runes to gather up. Head southeast where a group of giants are. There is a statue with a glowing object inside. You will need to bait one of the giants to smash the stone so you can collect five smithing stones and one rank 2 smithing stone. Go northeast from there until you hit a Lost Gravesite near a bridge.

Steps 13-17: Flask of Wondrous Physick, Sacred Tear, and More
Fifth, go east and grab a smithing stone. From there, go directly southeast past the merchant. Keep going downward, jumping off cliffs towards the next destination. You will be met with another set of tombs with Runes to gather. Go northeast towards the tall edge of a cliff. Get off your horse and jump down to the platforms to the right of the ridge. At the bottom, there will be a fight between a pack of wolves and a bear. Run past them and grab the rank 2 smithing stone.
Head southeast until you run into an abandoned church. This is the Third Church of Marika which has a Lost Gravesite, a Sacred Tear, and a Crimson Crystal Tear. The Crimson Crystal Tear will also get you your new Flask of Wondrous Physick. Fast travel back to the Stormhill Shack for the next part of your route.

Steps 18-19: Sacred Tear and Sorcery Vendor
Sixth, go north where it banks to the left towards the castle. However, from there go right on the dirt path. Through the forest, you will come out onto a bridge At the end of the bridge, go left and down the path towards a hidden pathway. Follow the path northwest past a pack of wolves. This will lead you to Liurnia of the Lakes and a new Lost Gravesite. Activate this site but do not rest at it yet. Go to the nearby church first. Inside you will find another Sacred Tear and a merchant selling Sorcery instructions.

Finally, go back to the Lost Gravesite and go to the Roundtable. Use your Sacred Tear at the table to increase the amount of HP/FP replenished by your flasks. You can use then use the Roundtable Hold area to upgrade your weapons, improve your buffs and spirits, and take on side quests for future improvements to your gear.
Elden Ring is out now on PC, PlayStation 4 and 5, Xbox One, and Series X|S.


Published: Mar 3, 2022 02:46 pm