It is reasonable to assume that everyone has had their fair share of time to familiarise themselves with the ten new maps that were bundled with Battlefield 4. Of these locations, there is a strong mix of open mountainous regions for the lonesome sniper or the hectic interior chokepoints fit for the kamikaze with the shotgun attachment. Games will always range from five-point close encounters to annihilation when it comes to the end result and it can sometimes feel like you are doing little to influence the tide of battle when you are one of sixty-four players on a next gen system.
Below is a guide featuring a number of techniques and tricks that should help give you a boost when it comes to turning the battle in your teams favour on Battlefield 4. This guide is based around the large-scale conquest mode as it reflects the need to dominate key areas of the map. Keep in mind that some tips may be obvious for veteran players.
Siege of Shanghai
An odd contrast of a large-scale map that is made to feel incredibly compact, Siege of Shanghai seems pretty predictable match after match. Of the five capture points available, the dominant focus is always on the central C which resides at the top of the skyscraper. This seems to be the obvious choice as the other four points are split evenly over each teams ‘side’ of the symmetrical map whilst C is situated in the centre. It also grants additional abilities to a team’s respective commander when captured and therefore the top is often a hive of activity.
What always seems to occur, however, is that the team who bares control over C will then attempt to hold the fort with sometimes up to half their team stationed within this one small area, often attempting to snipe on those below. The match will then generally head one of two ways; the majority of the losing team will attack C and retake control albeit too late to make up for the amount of tickets lost, or the losing team will attack C and fail to regain it for any significant period of time as it turns in to a squad-spawning tug-of-war.
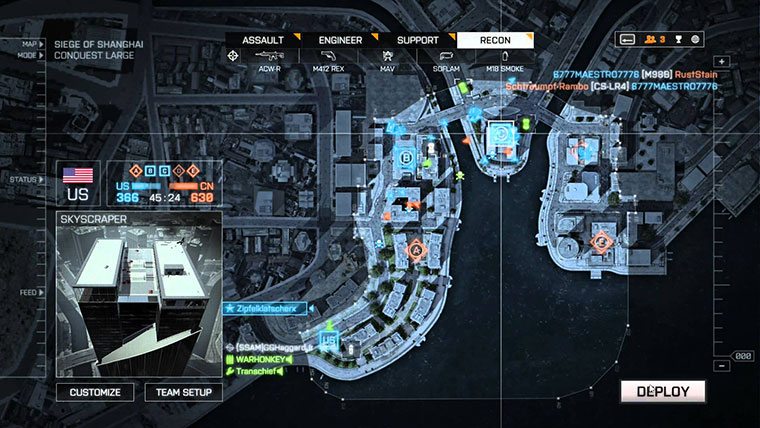
The thing to note here is that all while this is happening, there is often scarce amount of the dominant team in or around point A or B (assuming they spawned on the left side of the map). If you are in direct communication with your team, then this is a good time to suggest half your team focusing on A and B whilst the other go for D and E. Any opposing forces on the ground will often be spread too thin to defend and dominating four of the key areas, even for a short time; will drag their score down incredibly quickly. If there are issues communicating this with your team, then lead by example and take the base closest to their spawn point (again, A if they are based on the left). LAV’s are great for getting quickly between capture points on this map due to their combined speed within the map layout, whilst also providing effective artillery to fend off any individuals attempting to defend the area as they head past.
Snipers from C are generally in-effective at covering all four checkpoints, particularly at that range and with the high-rise buildings often preventing them from seeing many key targets apart from the roof of D and the shoreline. The enemy will eventually wise up and begin to push for the other areas, but by this point it is often too late as your team should have established strong defensive positions at two to three of these locations. If they do begin to over-power your team again through aggression, this might be the ideal time to take down the tower. When it goes down and the capture point moves, players have an odd habit of flocking directly to the site, often resulting in a close-quarters bloodbath. There is also the added benefit that C becomes inactive as a capture point whilst the tower is collapsing, providing a possible complete domination for a short period of time. Repeat the earlier process of attacking the more obscure and deserted points and your team will likely have the advantage come the end of the match. This theme of capturing the points right on the enemy doorstep is a tactic that often bears up, as you will see across the other maps.
Paracel Storm
Paracel Storm features what I would consider the most fiercely contested capture points of any map in the game. Both teams are based parallel to the five capture points which means that right from the start, there is little indication as to which points each team will hold after the first few minutes. Capture point D leans slightly closer to the Chinese team whilst the US are closer to C, but it is very open to speculation in the beginning. Due to this, it is best to save customisation or strategic loadouts for later. Jump straight into the action on whatever vehicle you can find and get over to a capture point first.
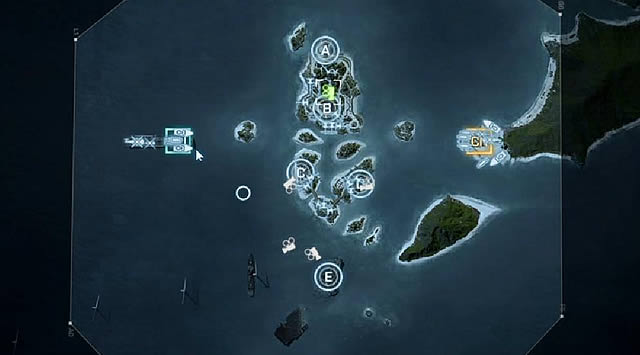
It should go without saying, but much of the dominant force on this map comes from aerial, sea-based and infantry combat. If your team is losing out in two of these three areas then you are going to have difficulty surviving long enough to take control. If you can get hold of a fast attack boat, clear out any aggressive enemies attacking the shoreline before patrolling the islands. It is tempting to sit near one point and tag any enemies that come past, though it is more effective to circle each island and support squads which are engaged in a close firefight. As long as the infantry are doing their job, your enemy will struggle to take points that have defensive infantry and heavy sea-based artillery patrolling.
If you prefer to be on foot, consider basing yourself on one island. Without a vehicle, it is time-consuming and difficult to hop from one point to another. You will be much more effective at dealing with one point and letting your team deal with the rest. This is a particularly effective strategy when implemented on point E. This is by far the most isolated capture point on the map and it is seemingly immune to attack from enemy boats as it is one of the most raised points on the map. There is a lot of debris which makes it hard to spot enemies, so picking a spot in cover and waiting for them to come to you is often the best choice.
Operation Locker
I have heard this map called many things over the past month or two. The general consensus is that it is chokepoint central and that there is only one way to win; push back the enemy team. Whereas I mentioned that Siege of Shanghai does tend to play the same quite often, Operation Locker is always the same and that is due to the manner in which players are funnelled down the map.
As soon as the game starts, players from either end of the underground prison complex begin running past the four objectives that are evenly spread amongst the complex to capture point C (a control tower) and open fire on one another. The outcome of this brief encounter then determines who controls C and effectively the rest of the match…usually. The controlling team can happily find a spot with their sights aimed directly down either the upper or lower hall and easily deny any attempts for the other team to get through to even challenge for C.
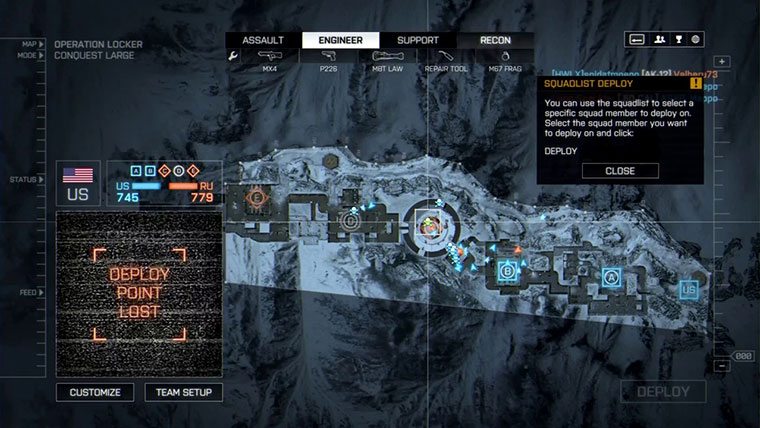
The usual method of counter for this is to flank around the side of the map where an outdoor snowy walkway leads to another entrance to capture point C. The issue here is that by the time this occurs, C is generally teeming with enemies that are incredibly difficult to eliminate due to the restricted movement and squad spawning. Of course, there is every chance that your side may be in the better position here but that doesn’t necessarily mean you have all bases covered (pun fully intended).
If the losing team can make it to the outside flanking entrance for C, then the usual decision is to push in and try and find a way to capture the central point. As I’ve mentioned, this is near suicide. What players often neglect is that the outside path rarely has heavy resistance along it. It only takes a small squad to push through to the end and by this time you will often completely bypass the entire enemy team who are spawning much further up the map with the ambition of pushing your team back and picking up easy kills. Going back to the theme mentioned earlier, you are now free to capture the two points that are right in front of the enemy base. There is every chance that you may get killed in the process, but it changes the entire dynamic of the map.
The opposing team are now forced to drop back and re-capture these points and, as they are usually not in communication with one another, your team now has the perfect opportunity to push up and capture that central point. As you can imagine, this is a tactic best implemented right from the start if you fall behind so as to hold the majority for the longest. If you manage to pull this off and find the opposing team trying to find a way to re-capture C (or if you have had the central point from the start), consider pushing yourself or anyone you are in contact with on to the path outside to prevent them applying the same trick. If the team is spread out well, you should have the man power to ensure there is no way around.
Although this is only one trick for this map, matches of this type play out this way almost every time (aside from the occasional lucky breakthrough), so there is little that can/needs be changed in terms of attacking the objectives.
Flood Zone
When trying to set down a tactic which can be effective on a regular basis, it requires the map to have a bit of regularity itself. This is what makes pinning down continuously useful tactics and plans so tricky when it comes to Flood Zone. The map itself has ‘regularity’; it floods, the rooftops fill with players and so on, but the manner in which the game flows seems to vary so greatly and with so many variables that it makes it very hard to gauge the best way to proceed. It resembles Paracel Storm in this manner but to a greater extent.
Everyone knows the score, map starts out with most combat taking place on the roof and the rest usually in land-based vehicles below. Soon enough, the flood comes and the attack boats come into play. The main thing to focus on is how the domination of the capture points is usually spread between infantry and vehicles. Of the five capture points, B and C both generally require infantry to secure which also results in taking the central ground of the map. This seems like the ideal strategy but it often leads to a team being completely surrounded by the enemy as there is nowhere to get a foothold in the match from this position unless the teams are a complete mismatch in terms of talent.
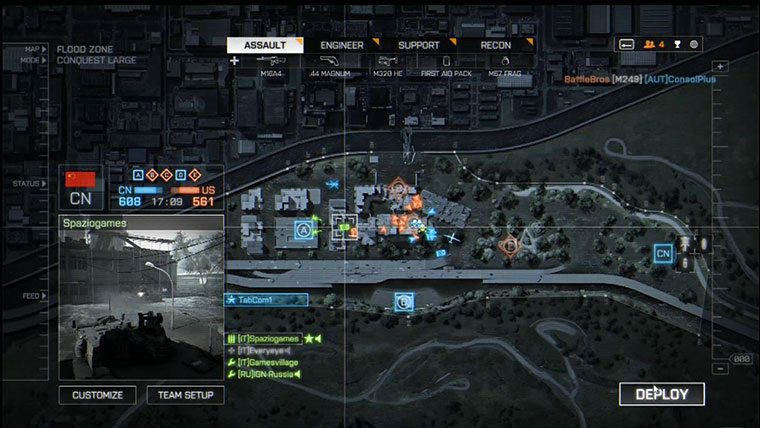
The question then really is what are the best capture points to control? Well, referring back to Paracel Storm once more, objective E there bares close resemblance to Objective D on Flood Zone. It is isolated from most of the combat hotspots on the map and is a tricky place for vehicles such as boats and choppers to attack due to the petrol station providing cover. Gear up as an engineer with your finest anti-vehicle weaponry and hop on a PWC (assuming the levy has broken) and head over to D. If you can clear out the objective and hold up in the station then it can really draw a lot of the heavy firepower away from other ground objectives (namely A and E). It is also relatively easy to destroy vehicles this way, as the numerous hiding places mean that the driver often won’t pinpoint you until you have sunk four RPG shells into him.
As I have stated however, there is no guarantee of this tactic as it depends a lot on the enemy strategy. Unlike Paracel Storm, there are a lot of vantage points for snipers to thin your ranks when holding ground objectives exclusively so it is advised to push for at least one of the higher ground objectives if this is the case. Keeping in mind the strategy for holding objective D as a backup, consider the following depending on how the match is moving –
- If your team is pushing for the centre objectives, try and attain a good sniper position (ideally on top of the two tallest building directly above the rooftops) and provide support whilst they push. From the towers, you can also pick off anyone at D that is not in cover and head there if need be.
- Avoid attack boats unless attacking/defending ground objectives. Boats, unlike wheeled vehicles, will not be effective against three of the five objectives, which means that if these are the ones you need to attack to gain a majority control, you will be wasting your time.
- The map is a little too crowded for what I shall now call the ‘enemy doorstep’ tactic, meaning there is no real objective on the map than can be exploited time after time. Instead, take a minute on the deployment screen to see how the enemy is moving and pushing and plan around that. The high intensity of the map means that a team will capture an objective and swiftly move on to the next leaving a small window where a captured objective can be acquired with little resistance.
Golmud Railway
One of the largest maps of what I would call ‘used space’, Golmud Railway is focused predominantly around vehicular combat; providing numerous tanks, LAV’s, choppers and jets for both sides. Despite the widespread layout of the objectives, you will find yourself in a vehicle of some description a lot of the time so travelling from point to point isn’t a problem. The main issue to overcome in this map is dealing with all this heavy weaponry.
It is likely that 90% of players on this map are either in a vehicle or using the engineer class to combat these vehicles. This of course makes sense when it comes to tactical loadouts, but it does leave a vast gap as the game wears on. You will find the most of the engineer/tank/helicopter battles take place on the lower edge of the map between capture points E and G. This is largely due to the fact that it is the quickest route forward for vehicles to any capture point, whilst capture point D is also situated in this area. This would also be my first suggestion when it comes to, controlling Golmud Railway; dominate the train.
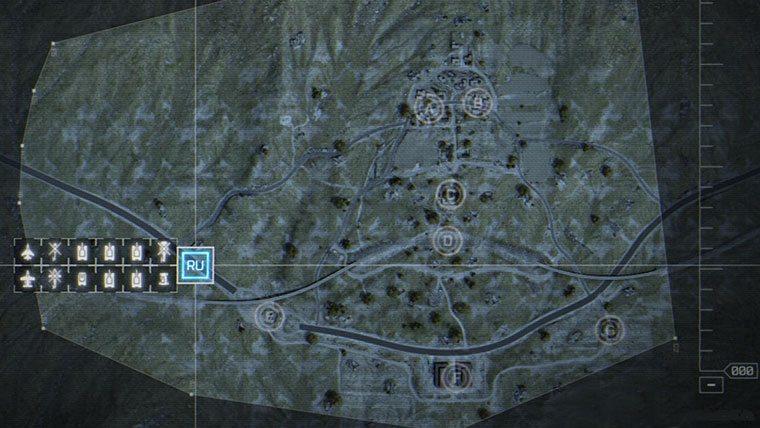
It seems obvious and players tend to do this regardless, but I am talking a relentless assault. You spawn, you jump in a vehicle, and you get close to that train. As many of you will know, once captured, the train upon which objective D is situated will move slowly towards your team’s base which gives you a huge tactical advantage in the long run. Negating every other point on the map may seem a poor idea, but when that train is on your side, it is incredibly difficult to move it away. Besides, assuming you have a relatively competent team, you should still have a couple of different objectives by the time you secure the train and therefore not be playing catch-up too much.
Whether you have or haven’t acquired D, it makes sense to focus mainly on the Northern objectives (A, B) before steadily moving your way South. As mentioned earlier, many players opt for the engineer class which makes sense when dealing with armour, but does leave a disadvantage in the villages where the Northern capture points lie. Both A and B are surrounded by a lot of cover, making it easier for someone with an assault kit utilising first aid to last when compared to an engineer who would have to make the long trip back up from their base. Even if a vehicle does venture up to the capture point, there is often little it can do when matched with two or three hidden players as they have the stealth to both capture the objective and hide from the enemy.
Dawnbreaker
Dawnbreaker not only bears a striking resemblance to Siege of Shanghai in terms of appearance, it also plays in a very similar manner to. Skyscrapers, vehicles and one hotly contested capture point mean that you can probably take a lot of suggestions I made for Siege of Shanghai and apply them here, though be wary are they are not quite identical.
Contested capture point C is not quite as close quarters as it is in Siege of Shanghai due to the bridge upon which it stands being in the centre of a large intersection. There is a great deal of space and visibility which allows for players to sit back a bit when defending the objective as opposed to being forced into a firefight. Additionally, ground vehicles have access which also pushes most infantry back, giving the illusion that the area is clear whereas there are a dozen crosshairs aiming at that very spot.
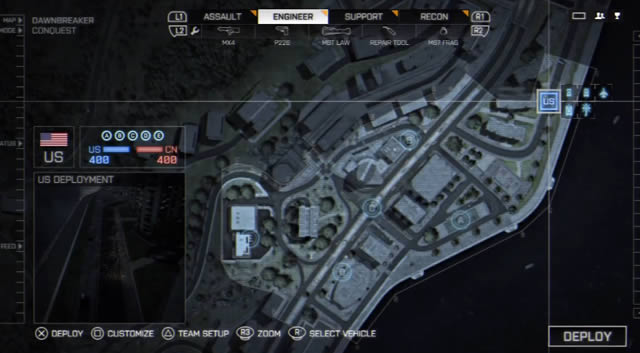
In terms of tackling this map, it is another instance where watching the flow of battle will help greatly. Objective C is so open that it will often feature in a continuous tug-of-war unless one side is particularly dominant. There are roads either side of the maps which lead to objectives or the chance to flank if you desire to push round the middle. At times these routes will clear up allowing you to get in behind the enemy and take them out or sneakily acquire an objective. My now patented ‘enemy doorstep’ method unfortunately will not apply here as the far objectives (A, E) act as a cut through for enemies and will often be too hot to engage sneakily.
This is also the rare occasion where it might be beneficial to actually sit back and take up a sniper position on one of the rooftops. If they enemy is winning all the 50/50 battles on the ground, having someone on over-watch can make all the difference. It is generally best to avoid this method on other maps as it doesn’t really pay off when it comes to kills versus influence. Due to the aforementioned open areas around objective C, however, players defending on the ground have a noticeable habit of lying prone in cover; thinking they are safe from fire around them. This makes it easy to rack up a number of kills that not only benefit yourself but the progression of your team by taking out the key infantry which are holding them back. I would advise using this method sensibly though, as the rooftops are often chock full of enemy snipers who can take you out before you have even got into position. Repeatedly spawning on a rooftop for half the game to get just a single kill isn’t going to benefit anyone in the end except your aggressor.
Hainan Resort
Dawnbreaker is to Siege of Shanghai, what Hainan Resort is to Paracel Storm. In other words, Hainan Resort’s layout is close enough to that of Paracel Storm that following my advice for the latter will serve you well, though again there are some differences. Namely, the rather large hotel situated right in the middle.
Patrolling with an attack boat is actually more effective here than on Paracel storm as you can get in close to objectives and provide a much more suitable defence. In fact, of the five objectives, three are within ten metres of water or less. It is also a lot safer than Paracel Storm for an attack boat such as the RCB as there are not really any other vehicles (apart from other attack boats) that can match it for strength. For the most part then, if you can fend off other boats and get between the three shoreline objectives (A, D, E) quickly and efficiently, then there is little to prevent your team walking away with the match.
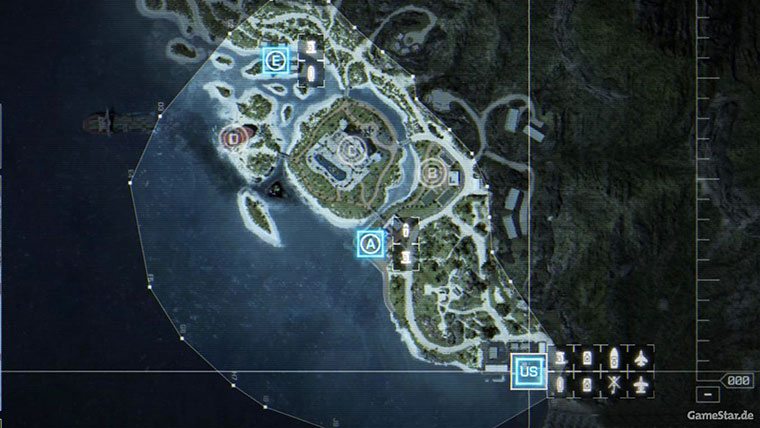
Unfortunately, it is nearly impossible to patrol the coastline by yourself and indefinitely. If the opposing team is pressing hard for the shore then it is usually only a matter of time before you are taken out so it is good to have a fall back/alternative plan.
As usual, C is the place to be when it comes to action and the back and forth is constant. When you do have control, the building is susceptible to fire from an LAV at the front entrance. Placing down something as simple as an AT Mine or Slam in this area at the start of the match has always yielded results for me personally. In fact, I can’t name a game where I haven’t taken out at least one vehicle by using this simple method and it really takes the pressure of the rest of your team who want to focus on the multiple entry points from which enemies can enter. When you have C locked down, why not head to the top of the hotel and scout the area to see the best available choice to attack next. The ‘enemy doorstep’ technique is readily available to use here on either A or E depending on your spawn and you can reach any of the objectives immediately by parachute when jumping off the hotel. Rinse and repeat this method and the pace can be hard to keep up with, especially if the rest of your team is performing their duties.
Lancang Dam
In joint pole position with Zavod 311, Lancang Dam is possibly one of my favourite maps for the simple reason that it features a bit of everything. The map design is absolutely superb here and though many players aren’t a fan (trust me I am aware), you have to admire the way it manages to allow everyone to fight in their preferred style.
Air, ground and sea vehicles are all readily available whilst the compact buildings contrasted with the large mountainous regions make for some really diverse experiences. It is for that reason that it can be difficult to establish a pattern to analyse and work around. You never know quite how many snipers you are going to be dealing with in the hills or how the enemies will utilise their armour. In fact, it isn’t uncommon to see a tank attempting to take a sniper out from the other side of the map, such is the line of sight. Despite this, there are some handy tips when it comes to choosing your attack strategy.
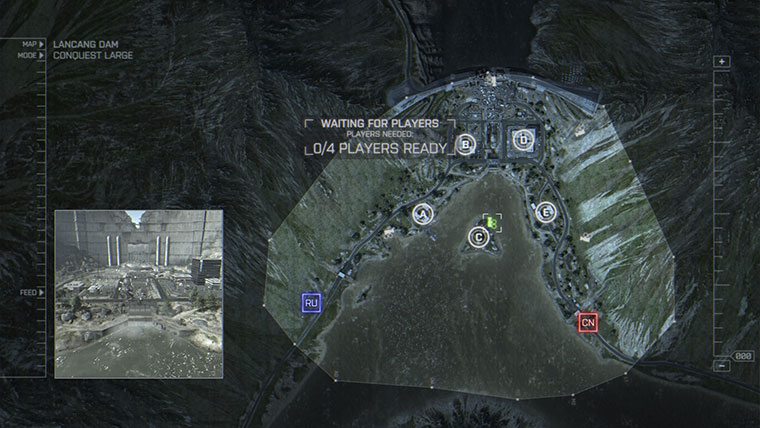
Objective C (situated on the central island) can be one of the most frustrating, yet important positions to hold. If captured on foot, there is little you can do to assist your team with any other objective as you are so isolated. If you are going to choose this method then consider picking the recon class and setting up shop. You will have to deal with an infantry soldier roughly every twenty seconds so it may not last, but if you can hold the objective for a few minutes and take out some snipers on the hill then you have done a great job. A simpler, yet equally frustrating method is to hop in an attack boat and circle the island. It isn’t too difficult to pick off enemies on the island but it becomes easy to lose concentration on your fifteenth lap. There will usually be plenty of armour to attack on the coast, but this also means you may not last much longer in the boat than on foot.
Players in a ground vehicle will often take the quickest route when trying to cross to the other side of the map. There are two bridges that cross over the dam riverbed but nine times out of ten, people will opt for the most direct, Southern one. Place your mines on the centre of here and wait for the enemy armour to go boom. Being that these bridges are right in the middle of the two most contested objectives on the map (B, D), they are the key to successfully controlling the areas in which the opposing team can move. This doesn’t mean pile over them every time, but simply prevent armour from getting over whilst escorting your own through and the advantage is really with you.
Rogue Transmission
You have to unlearn a lot of what you know about basics of Battlefield multiplayer to succeed at Rogue Transmission. There are so many areas which trigger your instincts from having played effectively on every other map, but now seem to not work. This can be remedied and doesn’t mean that it is a blind panic when it comes to trying to win; you just need to change it up a little.
For example, overlooking objective D is a huge mountain with ridges at various elevations. When at the top of said mountain looking down at the multitude of enemies swarming around D, your brain will instantly go ‘Sniper, now’. Any other map this would make sense, but here, you find yourself stuck in the middle of three objectives (A, B, D). This makes this mountain a main crossroads for anyone trying to get to one of these objectives. You will hardly have time to pull the trigger before an enemy has run up behind you and shoved his knife in a rather uncomfortable place. On the flip side however, if you take a step back and instead consider going for an assault weapon, a good drop on the enemies residing upon this hill can wipe out a huge chunk of players, leaving you and your team with plenty of room to go on the attack in multiple directions.
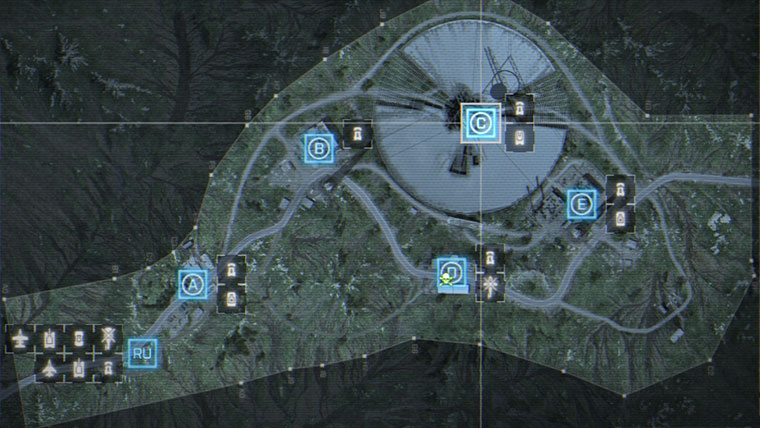
Similarly, with an easy access route right down to the capture point, objective C looks like the ideal place to park up with a tank or LAV and just wait for the enemy to come to you. In reality, you are actually a sitting duck for anyone in the vicinity. Being under the radar dish and surrounded by a construction site makes you highly susceptible to a sneaky C4 attack. This is made easier by your enemies with the high ground advantage that surrounds the capture point. In short, it is difficult for you to see enemies, but very easy for them to see you. Your best bet is to sneak your way down and find some cover; nothing original, but as effective as anything else. Also, whilst on the subject of the radar dish, don’t walk across it unless absolutely vital. A soldier in dark attire running across a wide open white area with no cover; you may as well lie down there and then.
Zavod 311
As I say, Zavod 311 is another one of my personal favourites. I find it odd that a map centred on the idea of abandonment, antiquity and isolation can be one of the most interesting to explore. It has that same quality to it as Lancang Dam; there are hilly woodland areas on the outskirts from which snipers can flourish and the abandoned factories which are constantly a source of violent conflict.
This is a map that brings together so many elements that I have talked about before, but even then, it is one that is incredibly difficult to influence on your own. You have to plan your attack patterns very carefully or else you risk winding up in a situation you are fully unprepared for. I found myself at one point cowering by an objective in a train carriage as my assault loadout didn’t really cater for the two tanks firing shell after shell upon me. Indeed this is a map where it doesn’t take a Levolution event to change the dynamics of the game.
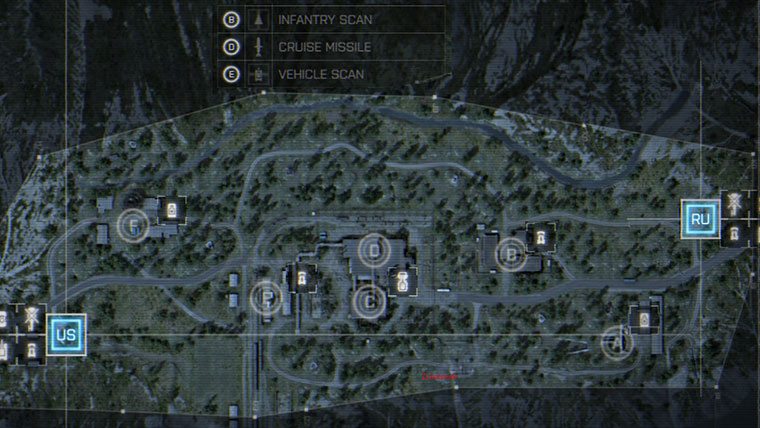
As I say, the central objectives (C, D) are the dominant combat hotspots and the most sought-after ground on the map. Problem is, you have to control both of them to truly have the edge. While there is no reason that you cannot just get one and push further out for objectives closer to the enemy base (effective as the large map means players are spread thin), you risk a continuing pattern in which the opposing team will circle around the map over and over again, taking back any objective your team might have just captured. This seems to happen if you leave one of the central objectives out of your control and go searching for another in a horizontal line (West to East, for example). To elaborate, imagine that that you and the enemy both control three objectives; two on your own side and one in the middle. If a large enough portion of your team pushes East (if you started on the left) to try and claim B, this means that the enemy can easily pick up your central objective. Through this, you have isolated the squad that has pushed onto B as they are now surrounded on all sides and when they are eliminated will be forced to try and reclaim one of the central points from right back at base, a feat that if not difficult is at the very least time consuming.
This isn’t to say that you can’t turn this tactic on your enemy if the opportunity presents itself. If you suddenly find yourself with the option to push the enemy back in search of a further out objective or to grab the central position, then do the latter and stand your ground. No matter what is thrown at you, the constant stream of teammates that naturally pour into these areas whether they intend to defend them or just pass through, makes it so difficult for the enemy to outnumber you that you can secure a healthy lead with little the enemy can do to stop it; unless they of course use the world-renowned ‘enemy doorstep’ technique once more. With the exception of maybe Operation Locker, this is where the technique can be used most effectively. The sheer scale of the map means that it is simply impossible for a team to cover all bases sufficiently to ward of an attack. If you do find yourself in the position of isolation that I mentioned before, then this may be your best chance to produce a result from the situation.
Summary
I am aware that many of you will look through these and dismiss them off-hand and that is totally understandable. These techniques won’t suit everyone, but they are ideas that myself and many others have found to work in situations where your brain isn’t helping. Even if you are a seasoned, hardcore veteran then I hope there is something you can pick out that at least makes you consider a different approach. In fact, even for those new to the franchise, I wouldn’t recommend following everything in this guide. Find your own way of playing and what suits you.
What was your opinion on the concepts in this guide? Maybe there were more topics you wanted to see in greater detail? Leave a comment below with your thoughts!






Published: Mar 2, 2014 06:14 pm