We’ve went pretty in-depth into the Workshop mode in Fallout 4 with this guide. However, some elements have been especially troublesome for many players. Fallout 4’s Workshop is really great, allowing you to build pretty much anything you can imagine in the game, but it has very little in the way of a tutorial. So, check out this quick guide if you want to find out how to connect power in Fallout 4’s Workshop.
Obviously, the first step to this is building the item you want to hook up to power, and a generator to produce the electricity. These items should be covered in the link above, so just read through it to get an idea of what to do. If you’re lacking some items you can check out our other guide on how to find copper, circuitry, and other rare resources in Fallout 4.
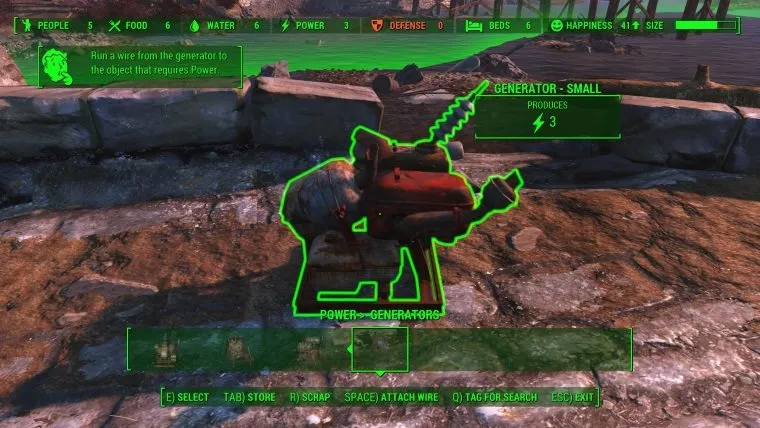
Once you have what you need you just have to hook them up. To do this go into the Workshop mode as normal and head toward the generator. At the bottom of the screen you should see a prompt for “Attach Wire”. This should be the Space Bar on PC, Y on Xbox One, and Triangle on PS4 but check to be sure in case you’ve switched your controls around at all.
The key ingredient for wire is copper, so refer to the other guide if you need to find some. If you have the required resources the wire will attach to the generator and you can walk over to the object that needs the power. Hit the Attach Wire button again and it will complete the circuit.
Of course, to do this the two items need to be close enough to each other for the wire to stretch. If you are powering up multiple things, or need to do some fancy arrangements for some reason, then you’ll need a little extra to get everything hooked up. Inside of the Workshop menu you’ll find poles that will let you connect wire to them and transfer power. Just pop up a couple of these along the path and you should be good to go.
Let us know if this helps in the comments below, and feel free to post any other Fallout 4 questions you might have.


Published: Nov 13, 2015 03:23 pm