Final Fantasy XII The Zodiac Age is notable because it is arguably the most complex mainline Final Fantasy to date. Between gambits, jobs, loot and other systems, there’s a lot of stuff for new players to absorb and understanding them all can make a world of difference in your first playthrough.
Things start off easy enough when you’re fighting rats in a sewer, but as things become more complex, it becomes increasingly necessary to know your way through the game’s various mechanics. And it’s in your best interest to do so: there’s a world of difference between a playthrough done by players who understand these mechanics and those done by those who don’t.
Fortunately, this is where this guide comes in. Below are is a run-down of the various mechanics that I believe are the most important for new players to understand.
Gambits
You get introduced to gambits in passing early on, but you only get to seriously interact with the mechanic after Vaan’s failed attempt at grand larceny. To put it simply, more than anything else, gambits are what will determine your experience in this game. The game expects you to only have direct control over one character at a time. Yes, you can issue commands to your teammates and you often will, but doing so repeatedly will get annoying quickly.
This is where proper use of gambits come in. By purchasing various gambits from the associated vendor (all are available after Barheim Passage), players can give their characters a list of actions to automatically do based on specified conditions. For example, a character can be set to heal an ally if they fall below a specified percentage of health or use a certain attack if they encounter an enemy with a certain amount of health. Just as important as the conditions for each gambit, is the order by which you put them. As the tutorial says, there’s a significant difference between placing an offensive gambit ahead of a defensive one and vice-versa. The order gambits are arranged in dictate the priority that characters will undertake each listed action. Therefore, a character who has an offensive gambit ahead of a healing one will only heal when there are no enemies to attack. On the other hand, a character with a healing gambit ahead of an offensive one will only attack if your characters are healthy.
With that in mind, there are certain gambits that should almost always come before others:
Ally: Any —> Raise (This means that whenever an ally gets KO’d, this character will use Raise to revive them)
Ally: Any —> Phoenix Down (Same as before but with Phoenix Down. Effective if you don’t have enough MP, Raise or worried about time)
Ally: HP < X% Cure (Characters with this gambit will attempt to heal an ally if their health falls below a certain point)
Ally: Any —> Esuna (Any character with this gambit will use Esuna on an ally who has any applicable status effects)
Similarly, there are some gambits that should always come after others:
Self —> Libra (There’s no reason to prioritize this ability over others in the middle of a fight. Simply use it yourself if you really need it).
Foe: Party leader’s target —> Attack (This is a basic attack gambit that prevents characters from attacking any enemy in sight, but they’ll ignore everything else in the fight regardless of what’s going on)
However, gambits aren’t all inclusive and even though your character might have a gambit that’s working the way it supposed to, it may still not work in a way you want to:
Foe: Any —> Dispel (This spell is used to get rid of beneficial effects like Brave or Haste, but debilitating effects like Slow and Stop are also removed using this spell as well…even if these are the only spells effecting an enemy)
Once you understand how each gambit works and how to prioritize them, you can start doing more expansive setups like this:
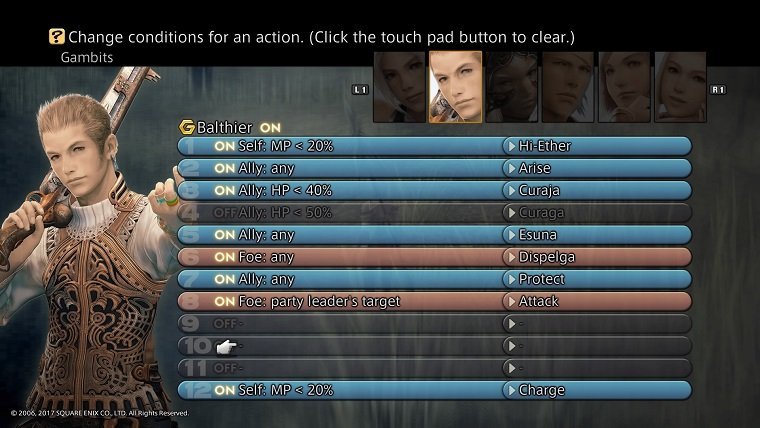
The setup allows Balthier (he was my primary healer AND used guns) to properly heal allies whenever they get damaged by a sufficient amount and immediately recover his MP should it run too low. Whenever he doesn’t need to heal or use any buffs, he can attack at range and actually deal decent damage due to his equipment and the way gun damage is calculated. You’ll notice I’m not using spells like Hastega and Protetga and that is because those spells are only found as treasure in an optional dungeon.
The best part about gambits is that they are non-binding. There are definitely several that are applicable to most situations, but there are others that are rendered entirely useless in certain instances. For example, my Fran is set to use Dark spells if there are three or more enemies on the field. This works well unless I’m fighting undead enemies (who absorb dark elemental attacks) and when I do, I can either turn it off or change it entirely.
Some gambits even have the potential to be used on multiple characters, though which of them they will ultimately have depend heavily on…
Jobs
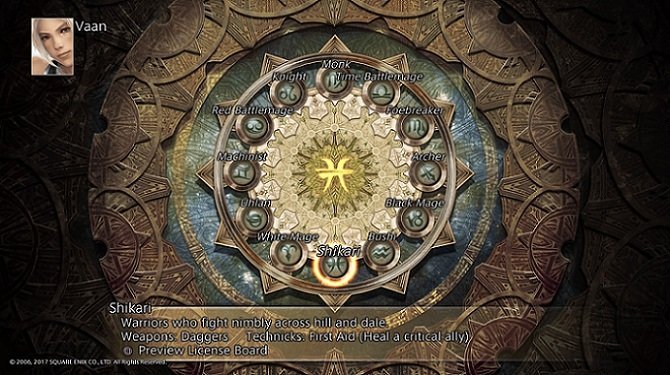
Jobs are the biggest difference between Final Fantasy XII The Zodiac Age and the original. In the original, each character powered up using the same license board which possessed every single license available in the game. In theory, players were supposed to pick up various licenses and equip their characters accordingly. The problem, however, is that there was no reason to do this as every character had access to the best equipment available in the game. As I mentioned in the review, why bother having a healer with mystic armor when you could forego the MP bonuses and give them heavy armor for boosted protection?
This isn’t the case anymore, as there are now 12 distinct jobs (represented by one of each sign in the zodiac) which ensure that each character has to stick to a specific role and use the equipment it demands.
These are the 12 classes and a simple explanation of each:
Black Mage – Offensive caster who uses black magick to damage and cripple foes. Uses staffs and mystic armor.
White Mage – Support caster who uses white magick to heal and strengthen their allies. Uses rods and mystic armor.
Time Battlemage – Support caster who uses time magick to strengthen allies and alter the flow of battle. Uses crossbows and heavy armor.
Red Battlemage – Mixed caster with access to arcane magick and lower levels of other trees of magick to deal with whatever the situation requires. Uses maces, shields and mystic armor.
Shikari – Light physical attacker/tank. Uses daggers, ninja swords and leather armor.
Bushi – Light physical attacker. Uses katanas and mystic armor.
Monk – Light physical attacker with access to limited levels of white magick. Uses poles and leather armor.
Foebreaker – Heavy physical attacker/tank with the ability to reduce foes’ stats. Uses hammers/axes and heavy armor.
Uhlan – Heavy physical attacker with access to limited levels of black magick. Uses lances and heavy armor.
Knight – Heavy physical attacker/tank. Uses swords, greatswords, shields and heavy armor.
Machinist – Ranged physical attacker and support. Uses guns and leather armor.
Archer – Ranged physical attacker and support. Uses bows and leather armor.
*To be clear, the term “light” and “heavy” only refers to the equipment available to a class. For example, a Monk and Bushi can out-damage an Uhlan because their weapons have high combo rates.*
At this point, you’re probably wondering which job a specific character should get. Well, it doesn’t actually matter. Here’s the thing: yes, each character has their own set of statistics which make them tailored toward a certain job (for example, Penelo has high magic, making her good Black Mage or Basch being a good melee character), but the game is designed so that any character can fulfill any role successfully. As such, any one character’s job won’t mean much. What’s actually important are the jobs you pick for your party as a whole and even then the game is simple enough that you could do whatever you want once you get more experience and apply it in future playthroughs.
It’s actually a very simple affair, but things can get a little more complicated thanks to…
Dual License
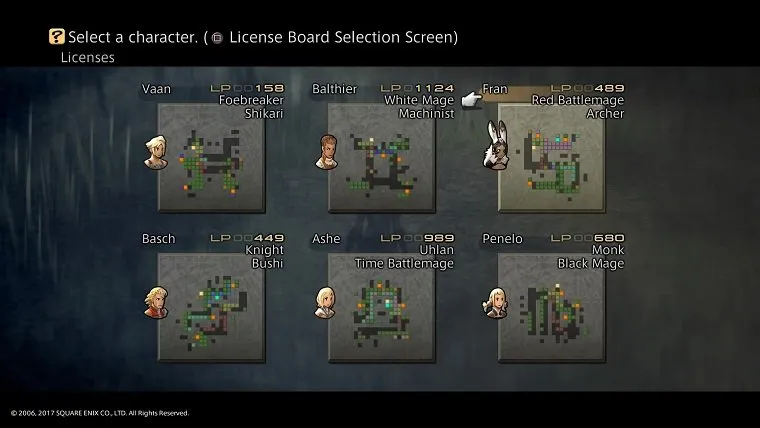
New to IZJS (and TZA, by extension) are dual licenses which allow characters to get a second job soon after assembling a complete party. What this essentially does is allow a character to double up on their roles, bolster/mitigate their strengths/weaknesses or create a new role entirely. This new feature can be a lot of fun to explore for those who are interested in squeezing as much out of their characters as possible, but it can be incredibly frustrating for those who aren’t good at that kind of thing or simply more interested in playing the game. The good news is that your second class matters even less than the first. In fact, you don’t need to pick one at all.
Do note, however, that if you do decide to pick up a second job, that some combinations are better than others. For example, a Black Mage/Monk is objectively better than a Black Mage/Foebreaker. Why? Because even though the Foebreaker gives a Black Mage extra health and heavy armor, a Monk gives Black Mage significantly more health and access to various white magick. Simply put, “bad” combinations won’t make the game harder, but good ones will make it easier.
For reference, here is what I used when I reviewed the game:
Vaan – Foebreaker/Shikari (Combines Foebreaker’s heavy armor (Genji gear) and stat-debilitating abilities with the Shikari’s Ninja Swords)
Balthier – Machinist/White Mage (Guns offer a White Mage the ability to deal ranged damage when they aren’t healing or buffing. Additionally, they can combine the White Mage’s Dark Robes and the Machinist’s Dark Shot to deal 50 percent extra damage with every attack. Lastly, since gun damage is fixed, the lack of strength boosting gear is irrelevant)
Fran – Archer/Red Battlemage (Red Mage has access to a plethora of magick and unique access to Ardor, a very powerful fire-elemental spell. Using the Archer’s Flame Bow, which boosts damage from fire abilities by 50 percent, and Oil, which further boosts fire damage to afflicted targets, Ardor can deal serious levels of damage to those who can’t resist or absorb fire damage)
Basch – Knight/Bushi (Uses heavy armor from the Knight to make up for the squishy nature of the Bushi. Genji Gloves can also be used to bolster the naturally high combo rate of katanas. Lastly, Samurai’s Magick Lore licenses can be used to improve the efficacy of the Knight’s white magick)
Ashe – Uhlan/Time Battlemage (Allows the Uhlan to get down and dirty when they aren’t offering support with Time Magick)
Penelo – Black Mage/Monk (Check the above paragraph)
Other than practical synergy, I was looking for combos that offered each character 3x Swiftness (12 percent increased charge time per license), license board cheesing (using a node on one board to activate a distant node on another) and “optimal” Esper use (explained in next section).
Of course, there are many other effective job combos that you can use. Combinations such as Shikari/Red Battlemage, Shikari/White Mage, Machinist/Uhlan, Time Battlemage/White Mage, Bushi/Monk, Black Mage/Red Battlemage, Bushi/Uhlan, Knight/Time Battlemage, Bushi/Red Battlemage, Foebreaker/Archer and Uhlan/Monk are all strong choices. Try to look at picking out job combinations for your party like filling out a puzzle, rather than looking at each individual character’s strength.
Finally, you’ll notice that I listed various combinations in a specific order (Foebreaker/Shikari, as opposed to Shikari/Foebreaker) and in the long run this won’t matter. However, you are stuck with your first class until you’re about 20-25 percent done with the game, so you have to at least consider the efficacy of each job in the short-term. For example, black magick is mostly underwhelming early on and Fran, Penelo and Ashe all can use Cure regardless of whatever class you give them. Generally speaking, melee classes with heavy armor will be the most useful, while mages (for various reasons) will be the least. The only potential exceptions to this rule are Red Mages (uses maces which uses a character’s magic stat in damage calculations), Time Mages (can use a crossbow for ranged damage) and Foebreaker (can potentially deal high damage with axes/hammers, but the damage range is wide and can often do little to no damage).
How you utilize dual licences will be a major part of what determines the efficacy of your characters, but there is still one more mechanic that needs to be considered…
Espers
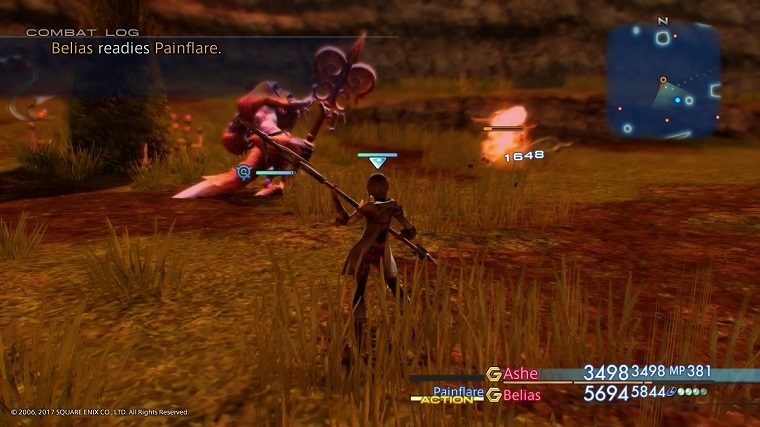
Throughout the game, you’ll have the fight mystical beings known as Espers. Upon their defeat, they will grant their powers to the party, allowing one character of your choosing to summon them in the battle. There wasn’t much more to them than that in the original game, but things are now considerably different. As you’re powering up your characters, you’ll notice there are “islands” that seem completely inaccessible and this is where Espers come into play.
There are 12 Espers in the game and each of them gives a job a unique set of abilities or equipment that they might not have been able to access unless they picked a specific job. This essentially means that players can give each of their characters the best attributes of three classes if they plan everything out well.
Here are some things that jobs can access using an Esper:
Black Mage – Heavy Armor and Bombs
White Mage – Greatswords and Daggers
Time Mage – White Magick and Swords
Red Mage – Greatswords, Heavy Armor and White/Black Magick
Shikari – Guns and New Techniques
Bushi – Heavy Armor and Swords
Monk – White Magick and new Techniques
Foebreaker – New Techniques and various stat boosts
Uhlan – Black Magick and new Techniques
Knight – White Magick and various stat boosts
Machinist – Bombs and Time Magick
Archer – Heavy Armor and new Techniques
As you can see, certain jobs gain better benefits from some Espers than others, and a big part of picking job combinations will be picking the appropriate Espers to go with them. For example, characters with a White Mage/Time Mage combo has little need of an Esper that provides White Magick, because they have access to all of them naturally. On the other hand, a Machinist/White Mage combo can make great use of an Esper that provides Time Magick because that character can help alleviate a Time Mage’s workload.
Loot/Bazaar
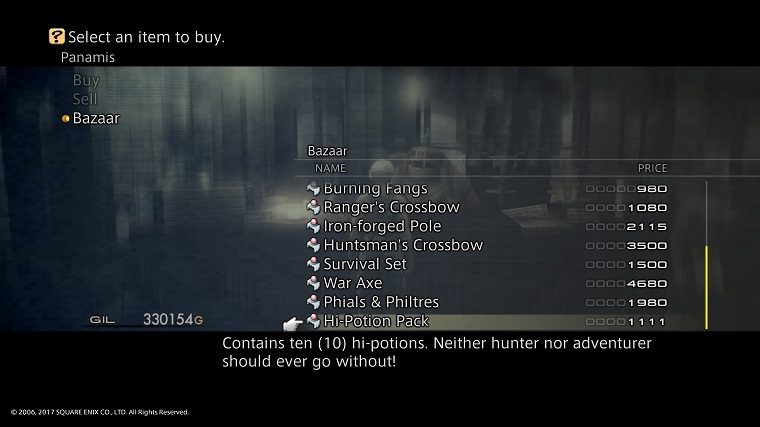
Loot works a little differently in this RPG compared to most others. Unlike other titles in the genre where loot primarily consists of consumable and crafting materials, loot in this game is mainly used as a means to make money and have various items appear in the bazaar. Such items are either rare, unobtainable by any other means or come at a discount if they are offered as a bundle.
The issue, however, is that you need to have sold a certain combinations of loot for a certain amount of times to have items appear in the bazaar and such loot isn’t always easy to come by. In order to deal with this, players need to either establish chains or collect monographs.
Chains are established when players continuously defeat enemies within the same family. For example, wolves in Dalmasca Estersand/Westersand and hyenas in the Giza Plains are technically different enemies but are still part of the same family. The chain extends as you defeat more enemies within the same family, which in turn increases the drop chances of enemies involved in the chain. The higher, the better. Of course, all good things must come to an end, and in this case, that end comes if you enter a town, touch a save crystal or kill an enemy of a different type.
As opposed to chains which improves drop rates, monographs expands the loot available from corresponding enemies. There are six types of monographs, each available in the bazaar upon completing certain tasks:
Hunter’s Monograph (Beasts and Avians) – Complete the Thextera Hunt, then speak to the merchant Gatsly at Muthru Bazaar.
Knight’s Monograph (Giants and Insects) – Talk to the owner of a weapons shop 30 times.
Mage’s Monograph (Fiends and Ichthians) – Talk to the owner of a magick shop 25 times.
Dragoon’s Monograph (Dragons and Plants) – Check the Hunt board 40 times.
Sage’s Monograph (Elementals) – Talk to the owner of any shop 100 times.
Warmage’s Monograph (Amorphs and Undead) – Check the Hunt board 20 times.
Scholar’s Monograph (Constructs) – Talk to the owner of an armor shop 15 times.
You have access to every single Monograph before you leave Rabanastre for the first time, though its unlikely you will be able to buy any of them at that point (18,000 – 22,000 gil). Of course, knowing how to get these early on will improve your cash flow in the long run. That said, don’t expect to suddenly start swimming in dough immediately upon purchasing a monograph, as they only expand loot tables not improve their quality. Most enemies will only have pebbles added to their tables — very few of them will have anything expensive added and in the case they do, they’re rare.
Marks/Sidequests
Marks and sidequests serve the same general purpose, obtaining various items and equipment for free — some ahead of when they would generally be available. Furthermore, both are locked behind story progression. The core difference between the two is that marks has the party fight a special enemy to complete it, while sidequests usually involve backtracking and item collecting.
Both are fairly straightforward, but one important thing to know about them is that completing certain ones allow players to access areas with high-level enemies — along with treasure chests containing equipment and abilities to match. If you’re cautious, it’s possible to avoid these enemies and reach the treasure, thus becoming far stronger than you should be at that point. Of course, doing this trick is absolutely not required to beat the game.
Of special significance is Montblanc who can be found at Clan Centurio HQ in Rabanastre. Aside from assigning elite marks (essentially regular hunts but harder), joining the guild is the only way for the player to access the Clan Provisioner at Muthru Bazaar. Depending on your rank (increases when completing hunts), this merchant will offer various items and an increasing array of Green Magick.
Libra
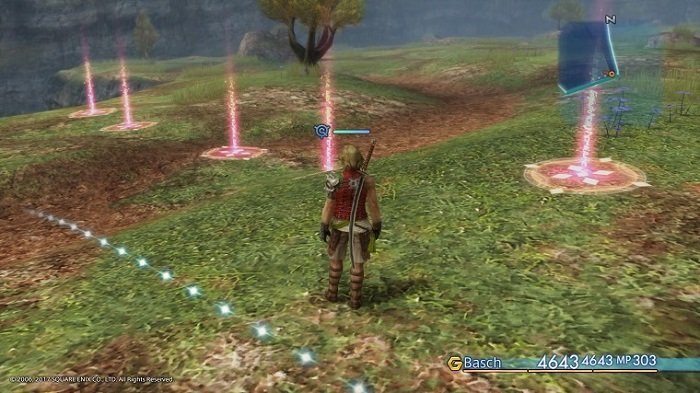
The last thing players need to know about is Libra.
Libra is a technique that players will be able to purchase early in the game and is accessible for the Archer, Machinist, Monk and Shikari, as well as anyone so long as they equip a Bangle accessory. Upon activating this ability, players will be able to see detailed information about enemies they encounter such as HP and weaknesses. In theory, this alone should make having Libra accessible at all times a priority, but it isn’t. Yes, seeing such information is useful, but its mostly unnecessary for most normal enemies as they die quickly (unless you’re in area you’re not supposed to be, in which case the color of their name is more than enough to tell how strong they are). What’s more, your allies are fully aware of what an enemy’s weakness is regardless of whether you have Libra activated or not, and will target it with the appropriate spell even if they’ve never seen that enemy before.
So, what is Libra’s primary use? Traps.
For whatever reason, traps are littered everywhere throughout Ivalice and using Libra is the only way to spot them. These traps can do anything from dealing damage to your characters, to inflicting them with various status ailments. Amusingly enough, there are also traps that can heal you. Of course, the catch is that you don’t know what any of these traps do before touching them, so avoiding them entirely is your best option.
In short, Libra is best served as a means to tackle traps and the ability to see an enemy’s details is more of a happy coincidence.
Conclusion
So there it is, everything a beginner should know to be able to make the most out of their first playthrough. To be clear, there are many other features included in this game such as unique animation speed for each character, glitching, farming certain enemies for early game advantages, when to access optional areas ASAP for high-level gear, etc., but none of those are necessary to know for beginners. If you use these tips, you’ll be taking Ivalice by storm in no time. Have fun.






Published: Jul 12, 2017 12:53 pm