The Old Teeth & The Worn Marks event-exclusive mode tasks Reverse 1999 players with joining Vertin and her party as they search for one of Tooth Fairy’s most prized possessions.
To make sure that you get all of the rewards available as part of the mode, here’s a step-by-step guide on how to complete all 21 stages part of The Old Teeth & The Worn Marks with a perfect rating in Reverse: 1999.
- Table of Contents:
- Stage 01: Brake Failure Guide
- Stage 02: Hold Your Breath Guide
- Stage 03: Reckless Driving Guide
- Stage 04: Secret Operation Guide
- Stage 05: Little By Little Guide
- Stage 06: Wailing Wall Guide
- Stage 07: The Importance of Being Punctual Guide
- Stage 08: Under the Surface Guide
- Stage 09: Fierce Competition Guide
- Stage 10: Castling Guide
- Stage 11: Steeplechase Guide
- Stage 12: Desperate Struggle
- Stage 13: The Symphony of Dots and Lines
- Stage 14: Trepidation Guide
- Stage 15: Border Exploration
- Stage 16: Crucial Choice
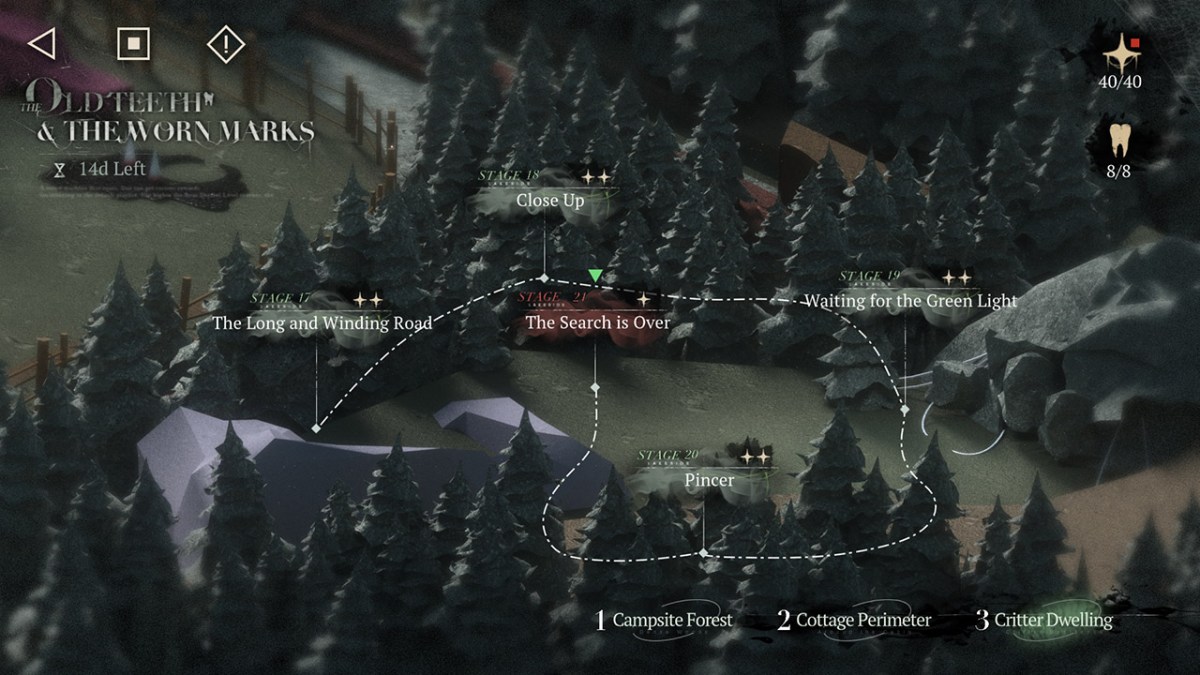
- Stage 17: A Long and Winding Road
- Stage 18: Close Up
- Stage 19: Waiting for the Green Light
- Stage 20: Pincer
- Stage 21: The Search is Over
The Old Teeth & The Worn Marks Stage 1 Guide
The first stage of The Old Teeth & The Worn Marks is also the tutorial stage, where you will be introduced to the main mechanics of the mode. To complete it, simply follow the game’s instructions and move in the way showcased below.

The Old Teeth & The Worn Marks Stage 2 Guide
You can complete Hold Your Breath by first heading up and right to eliminate the critter east of Tooth Fairy. Now, head up and then left to destroy the second set of critters before heading right toward the exit. Doing so will guarantee that you will complete the stage with the highest possible rating.

The Old Teeth & The Worn Marks Stage 3 Guide
You can complete the third stage part of The Old Teeth & The Worn Marks by first heading right and up to destroy the first critter before heading left, down, right, and up to destroy the second one.

Now that all enemies are defeated, just head left, down, right, and down again to complete the stage. Completing the stage will get you both the Bloody Baby Teeth and the ability to cast Concealment.

The Old Teeth & The Worn Marks Stage 4 Guide
Now that you can cast Concealment and become invisible for a set amount of time per stage, you will be able to complete Secret Operation by first moving left and activating the Concealment Arcane Skill before moving up and right to defeat the first enemy.

Now that the first critter is dealt with, you will be able to defeat the second one and complete the fourth stage of The Old Teeth & The Worn Marks by heading down, right, and up before heading down.

Related: Best Reverse 1999 Tooth Fairy Build | Best Psychubes and Team Composition
The Old Teeth & The Worn Marks Stage 5 Guide
You can complete Little By Little while also defeating all critters within 12 rounds by first moving up, left, and then up and right to defeat the first one.

Now, head left and down to destroy the second critter and right, up, and right again to defeat the third.

Once you complete the step above, you will be able to complete the stage while defeating all enemies within 12 rounds by heading down, left, and then up.

The Old Teeth & The Worn Marks Stage 6 Guide
To complete the sixth stage and deal with your first Screaming “Newcomer” critter —which will patrol in a set route and move once per round— first move Tooth Fairy up, right, and up again to defeat the stationed critter.

Now that the enemy is dealt with, move down, left, down, and right before using Concealment and moving down. Doing so will allow you to kill the Screaming “Newcomer” once it passes by you. Once the enemy is dead, head up to complete the stage.

The Old Teeth & The Worn Marks Stage 7 Guide
You can complete the 7th stage part of The Old Teeth & The Worn Marks in Reverse: 1999 by casting Concealment and heading up to kill the first critter before heading up, right, and down to kill the second one. Now, simply head right, down, left, and up to exit the stage.

The Old Teeth & The Worn Marks Stage 8 Guide
You can complete the Under the Surface stage by first using Concealment and heading up toward the first critter before heading left, up, and left again.

Now that you crossed to the other half of the map, you will be able to kill both critters and complete the stage by heading down, right, right again, up, and left.

Related: Best Reverse 1999 Blonney Build | Best Psychubes and Team Composition
The Old Teeth & The Worn Marks Stage 9 Guide
In the 9th stage, you will meet a Tooth Spirit for the first time. You can get rid of it and complete the stage by simply following the Tooth Fairy’s instructions before battling the enemy. During the fight, I recommend that you use a team featuring at least two Star characters.

The Old Teeth & The Worn Marks Stage 10 Guide
Although you can easily reach the tooth before the Tooth Spirit, you will need to defeat it to get all the rewards part of the stage. You can do that by heading up, right, and down before heading left, up, right, and left. Once the Spirit is defeated, simply head left to exit the stage.

After completing Castling, you will get the ability to cast the Arcane Skill Carry Back and Fourth. The skill will allow you to get past barriers/objects in the field.
The Old Teeth & The Worn Marks Stage 11 Guide
You can complete the Steeplechase stage by casting Carry Back and Fourth on the pile of logs on the right before heading up to defeat the Tooth Spirit. Once you do that, head up, left, up, right, and down to exit the stage with the highest rating.

The Old Teeth & The Worn Marks Stage 12 Guide
You can complete the Desperate Struggle stage part of The Old Teeth & The Worn Marks in Reverse 1999 by heading up before using Carry Back and Fourth to defeat the Tooth Spirit on the right. Once the spirit is defeated, follow the path showcased below to exit (up, right, down, right, up, right, and down).

The Old Teeth & The Worn Marks Stage 13 Guide
You can complete the stage by first heading down and right twice before heading right and left. Doing so will allow you to destroy two critters in 6 moves.

Now that two of the critters are defeated, cast Concealment and head down to defeat the final one before heading down and right to complete the stage with 2 stars.

Related: Reverse 1999 Tier List: All Characters Ranked From Best to Worst
The Old Teeth & The Worn Marks Stage 14 Guide
You can complete the stage while also defeating all critters within 10 moves by first heading up and right to defeat the first Screaming “Newcomer” before using Carry Back and Fourth to jump over the fence and defeat the second one.

Now that the two Newcomers are dealt with, it’s time to kill the Tooth Spirit. You can do that by heading right, left, and down before moving up again. Once the enemy is dead, simply head up, left, and down to exit.

The Old Teeth & The Worn Marks Stage 15 Guide
You can complete the Border Exploration stage with a 2-star rank by using Concealment and going up (in that order) to defeat the first critter before heading right to defeat the second one.

Now head right, cast Carry Back and Fourth, and head right again to defeat the final enemy. Once all enemies are defeated, you can clear the stage by heading down and left.

Reverse 1999 The Old Teeth & The Worn Marks Stage 16 Crucial Choice Guide
You can complete the Crucial Choice stage by first casting Carry Back and Fourth before heading to the right to defeat the Spirit there.

Once that’s done, head down to defeat the second one before heading left, up, left, up, and right to reach the exit and complete the stage.

The Old Teeth & The Worn Marks Stage 17 Guide
You can complete the Long and Winding Road stage by first heading down before going right and up. This will allow you to defeat the first Tooth Spirit in less than 5 moves.

After the first Spirit is defeated, just head up, right, and down to defeat the second one before heading up and left to exit the stage with a perfect ranting.

Related: Reverse 1999 Bkornblume Build | Best Psychubes and Team Composition
Reverse 1999 The Old Teeth & The Worn Marks Stage 18 Close Up Guide
You can complete Close Up with a perfect rating in Reverse 1999 by heading right and left before using Concealment and heading up to defeat the first Totth Spirit.

Now, head down and right before heading left and right to defeat the second Spirit. Once you defeat the enemy, just cast Carry Back and Fourth before going up and heading left to clear the stage. For some reason, even after defeating the enemies within 9 rounds, I was only able to get 2-stars by doing exactly as stated above.

Reverse 1999 The Old Teeth & The Worn Marks Stage 19 Waiting for the Green Light Guide
You can complete the Waiting for the Green Light stage by first casting Concealment and moving to the right. Doing so will allow you to defeat the first spirit in only one move.

Now that the first Spirit is defeated, you will be able to defeat the second one and complete the stage with two stars by heading left, down, up, right, down, and up before heading to the exit by going up and right.

The Old Teeth & The Worn Marks Stage 20 Pincer Guide
You can complete the 20th stage part of The Old Teeth & The Worn Marks with a 2-star rating by first heading right and up before using Concealment and going right one more time.

Once you finish the steps above and defeat the first spirit, you can defeat the second one and complete the stage by heading down and using Carry Back and Fourth to get past the barrier on your left before heading down, going up twice, and then heading left.

The Old Teeth & The Worn Marks Stage 21 Guide
Like the 9th stage part of the mode, the final stage of The Old Teeth & The Worn Marks can be completed by simply heading to and defeating an enemy —in this case the Tooth Fairy Queen.
To defeat the boss and clear the mode with all of its rewards, I recommend that you make use of a team featuring at least two Star characters, with one of them being either a sub or main DPS. As the opposing lineup will only feature Mineral types, do not use Beast characters.

This guide was made while playing Reverse: 1999 on PC.


Published: Dec 14, 2023 09:33 am