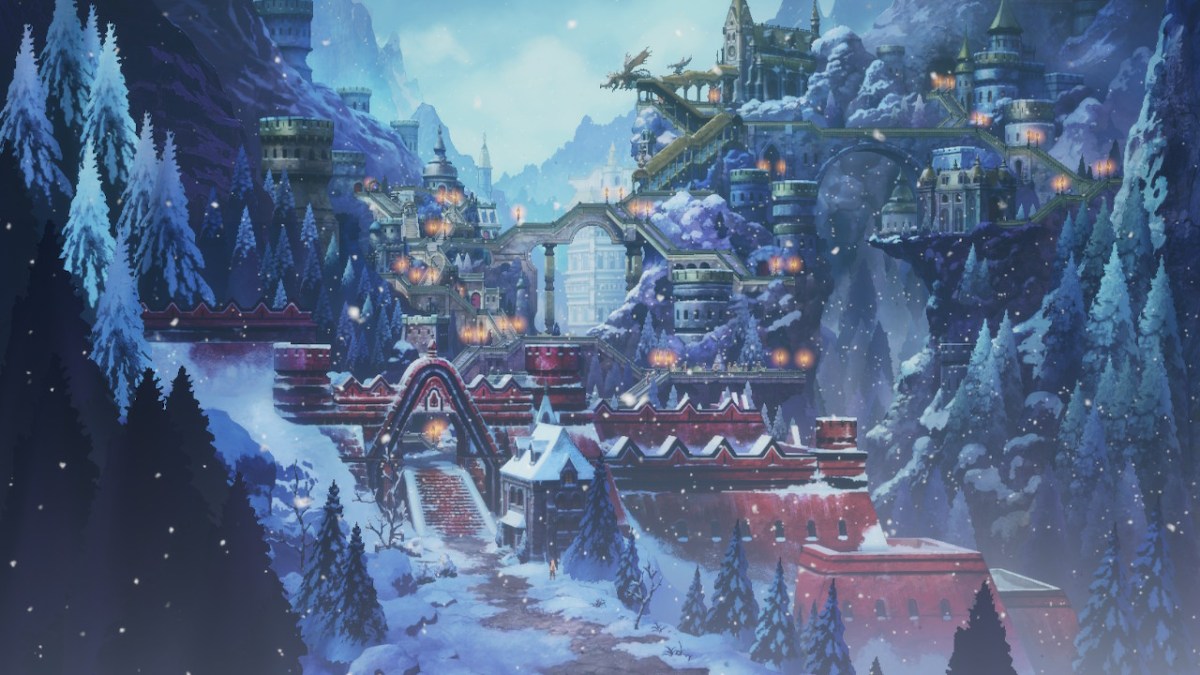
In Bravely Default 2 Chapter 3 you will head to the frosty town of Rimedhal, where things are clearly not right, and Part 1 of this walkthrough will help you get started on your quest to locate the next crystal.
Since Bravely Default 2 is a narrative-heavy game, I will try to keep all further spoilers to a minimum. Cutscene details will be scarce, and characters will only be named as required. Additionally, this walkthrough will follow a checklist format to keep things short and concise.
I will list monsters encountered along the critical path (to include their weaknesses), and treasure chests (as well as what they contain). Enemies and bosses are natural but necessary spoilers, so I’ll go ahead and tag this article with a mild spoiler warning here, and I will precede every boss with a more obvious spoiler warning.
Bravely Default 2 Chapter 3 Part 1 Walkthrough
Rimedhal
- Now that you’ve escaped the Wayward Woods it’s time to head across the snowy plains to Rimedhal.
- Point your camera north, and head west along the mountain path until you see a bridge to the north.
- Cross it and continue west then south to reach Rimedhal (the city to the left on your minimap).
- There be monsters here:
- Yeti (Beast): weak to Fire, Wind, Daggers, and Swords. Immune to Water.
- Counters physical attacks.
- Flanbanero (Aquatic): weak to Lightning, Axes, and Staves. Takes half damage from Fire and Water.
- Counters physical attacks.
- Kukulcan (Aquatic): weak to Earth, Darkness, Daggers, and Bows. Absorbs Water, Lightning, and Wind.
- Dusk Wizzy (Humanoid): weak to Lightning, Light, and Axes. Takes half damage from Water, and absorbs Darkness.
- Will Charm party members.
- Dagon Shaman (Aquatic): weak to Earth, Swords, and Spears. Absorbs Water.
- Polar Bear (Beast): weak to Fire, Darkness, Spears, and Bows. Takes half damage from Water and Wind.
- Vengeful Souls (Undead): weak to Light and Staves. Immune to Fire, Water, and Darkness.
- Aka-Oni (Humanoid): weak to Earth and Axes. Takes half damage from Water.
- Yeti (Beast): weak to Fire, Wind, Daggers, and Swords. Immune to Water.

- When you approach Rimedhal a cutscene will start, in which you’ll meet a new ally.
- Well, new to everyone but Adelle.
- Gwilym will join the party.
- Head into Rimedhal proper to trigger a quick cutscene.
- The first chest in Rimedhal can be found in the first building on the right. Head up the stairs and hug the the barrel in the top left (Mage Shell).
- Go up the stairs and rest at the inn directly ahead if you need to.
- The path to the left, which leads to the shop and exploration vendors, is blocked. Go right to continue the story.
- Once you reach the first tier on the right path another cutscene will play, and you’ll learn a little about the current plight plaguing Rimedhal.
- You can now head left, which leads up and to the right, where you’ll continue the story.
- Be sure to check out the vendor to resupply and grab new equipment, and be sure to visit the exploration vendor if you are returning from a break.
- Follow the path to the right and up to reach the chapel.
- Before you go all the way up, go down after crossing the bridge at the top and enter the storehouse. There are stairs that lead to an open doorway, and within is the second chest in Rimedhal (Snug Scarf).
- Continue up the tower stairs next to the second chest for the third and final chest (Light Talisman).
- Once at the tippy-top of Rimedhal enter the monastery with the golden awning.
- Go inside and head to the altar to start the cutscene.
- You’ll meet Gladys and Helio, who are clearly wielding Asterisks. They also like throwing suspected fairies off cliffs.
- Gwilym will inform Adelle that his dad Gwydion, the Lord of Dragon everyone is on about, would like to see her in the Serpent’s Grotto.
- This is your next dungeon, so be sure to stock up and rest if you haven’t already.
- A cutscene will play once you leave Rimedhal, and well, things are as shady as they appear.
- After it ends make your way north to the Serpent’s Grotto, which is the marked dungeon at the top of your minimap.

The Serpent’s Grotto
- The Serpent’s Grotto in Bravely Default 2 Chapter 3 is a vast cave, full of beasties and chests. It’s also a single zone, thankfully.
- You should be at least level 32 to not struggle here.
- Monsters in the Serpent’s Grotto include Cask Paraponera, Lux Elements, Turans, Kitty-Caits, and Ice Golems.
- Cask Paraponera (Insect): weak to Water, Light, and Swords. Takes half damage from Earth, and are immune to Darkness.
- Lux Elements (Spirit): weak to Darkness, Spears, and Staves. Takes half damage from Lightning, and absorbs Light.
- Turans (Spirit): weak to Fire, Darkness, Daggers, and Axes. Takes half damage from Water and Earth, are immune to Light.
- Kitty-Caits (Spirit): weak to Wind, Darkness, Daggers, and Bows. Takes half damage from Light.
- Ice Golems (Spirit): weak to Fire and Spears. Takes half damage from Earth and Wind, and are immune to Water.
- There are 9 chests in the Grotto:
- The first chest is to the immediate right of the entrance, along the path to a dead-end (4x Soul Food).
- Go back to the entrance and go under the arch, then hook an immediate left to what appears to be a dead-end. Instead, head down for chest two (2x X-Potion).
- Head back and continue down the path to the right. It’s fairly linear, so you’ll be on it for a while. When you pass the two chests in the distance below you and reach the fork head right for chest three (3x Meteorite).
- Fall back to the fork and go left until you go down some stairs. Immediately head down from here under the bridge you crossed above to reach chests four and five. Chest four has a Tent, and five will have a Lux Element and two Turans within. Kill them for a Gaia Rod.
- Return to the stairs and go right, following the path around then up. Skip the route you see on the left, instead continuing up and to the right for chest six (4x Ether).
- Go back to where the path split and go up towards the left. You’ll run into a save point and Dungeon Portal. Down is a dead-end, so head up to continue. Follow this route up and to the left until you go up a ramp. Follow this long path until you pass the Ice Golems and begin to work your way back down. The seventh chest is to your immediate right (Icefire Shield).
- Get back on the path and go left until you see a glowing ramp on your left-hand side. Go up to find chest eight (5x Mini Ether).
- Go right from the eight chest and across the bridge to reach chest nine. Kill the two Kitty-Caits and Lux Element for a Lamia’s Tiara.
- Go back down the ramp and work your way up under the bridge to a save point. You’ll notice an NPC standing guard.
- This is the next boss fight. Approach her to start a lengthy cutscene.
- After it concludes Martha will allow you a moment to prepare: if you used a Tent at the save point you should be ready to roll, but be sure you have a healer and a tank on-hand, and someone capable of dealing Fire damage.
SPOILER WARNING FOR THE UPCOMING BRAVELY DEFAULT 2 BOSSES AND JOBS.

Martha (Dragoon)
We have a full guide for the Martha fight here, but to summarize:
- Martha: 56265 Health, weak to Fire, Darkness, Daggers, and Bows. Takes half damage from Spears, Lightning, and Wind.
- This is a relatively simple fight – a contest of strength if you will.
- Have a tank Job grab Martha’s attention and soak her attacks.
- Use a healer Job to keep everyone topped off (White Mage preferred, but Red Mage will do if you have Ethers to keep their MP from bottoming out).
- Just hit Martha often and hard, especially with Fire attacks.
- Build up BP to unleash a flurry of attacks.
- Monks can hit Martha plenty hard with Flames of War and Focal Blast.
- Do be warned: Martha’s Soul Crush will purge targeted characters of all MP, and it is triggered as a counter to any damaging attack.
- That said, it’s not frequent. Keep a stockpile of Ethers on hand to overcome the attack.

Bravely Default 2 Chapter 3 Part 1 Walkthrough Finale.
After beating Martha you’ll unlock the Dragoon Job, followed by another cutscene. The team will rest in the middle of it, restoring all health and MP. You’ll learn why Gladys is so gung-ho to purge suspected fairies, and be tasked with confronting the Archbishop in Rimedhal. Simply leave the chamber to return to the Serpent’s Grotto, where you can either double-back to a Dungeon Portal, or use a Teleport Stone to return to the world map.
In Part 2 of the Bravely Default 2 Chapter 3 walkthrough you’ll return to Rimedhal to ask the Archbishop some tough question. The walkthrough can be found by following the link here.
Bravely Default 2 is available now on the Nintendo Switch.


Published: Mar 8, 2021 09:15 pm