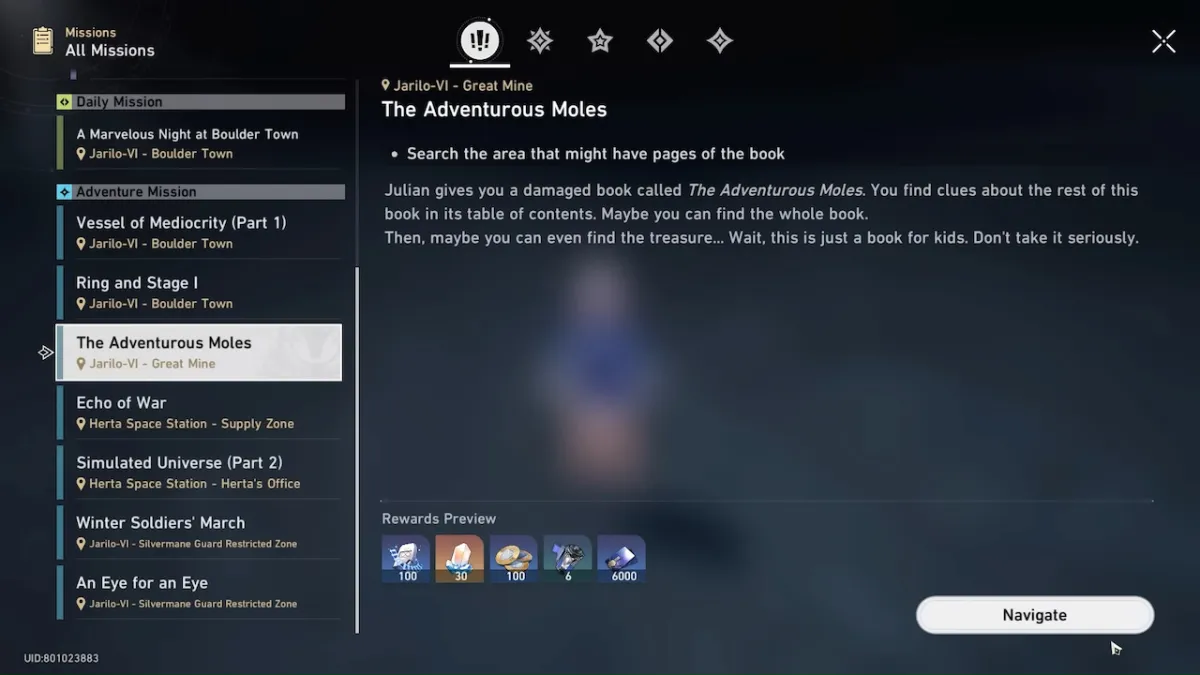
Honkai Star Rail has a vast array of missions to spend time completing and one of these is The Adventurous Moles quest which will have you looking through particular areas for pages. I personally know this can take time if you’re struggling to work out where to look.
This article will take you through exactly how to complete this Adventurous Moles mission in Honkai Star Rail and where you can find every page needed.
How to Complete The Adventurous Moles Mission in Honkai: Star Rail

First, you must talk to Julian and accept The Adventurous Moles mission from him. You will find him in Boulder Town by using the Natasha’s Clinic space anchor.

Then, you will be given the following hint: “If you follow the clues in the table of contents, you can find the corresponding locations where you can collect the pages of the book.”
The Table of Contents has the following pages you will need to find:
- The Missing Miner’s Lamp: Page 21
- The Unexpected Parchment: Page 3
- The Crates Are the Keys: Page 40
- Treasure Hunt on the Battlefield: Page 56
The Missing Miner’s Lamp – Great Mine

Head to the Great Mine using the Overlook space anchor.

From there, head to the marked location on the map above to find the Missing Miner’s Lamp Chapter.

After finding the chapter page, you must head to the above location to find the challenge.

Pick up the lantern that is sitting on the box and attach it to the fence in the section that doesn’t have one.

You will be rewarded with a Bountiful Treasure Chest.
Back to Boulder Town

Head back to Boulder Town Natasha’s Clinic space anchor. Talk to Julian and pick the About The Adventurous Moles… option. He will then ask you to track down the remaining missing pages with clues from the table of contents.

You can read the Table of Contents in your mission log. It will point you to the three missing chapters in Backwater Pass, Rivet Town, and the Silvermane Guard Restricted Zone.
Related: Honkai Star Rail: All Boulder Town Chest Locations
The Unexpected Parchment – Backwater Pass

Teleport to Backwater Pass using the Transport Hub space anchor. Head to the location I marked on the map, where you will find many tables and chairs.

Pick up the piece of paper sitting on the bench.

Interact with the chair that is flipped upside down. Choose the Lay it flat on the ground option.

Once this is completed, you will be rewarded with the second Bountiful Treasure Chest.
Related: Honkai Star Rail: All Backwater Pass Treasure Chest Locations
The Crates Are the Keys – Rivet Town

Teleport to Rivet Town using the Abandoned Market space anchor.

You need to head to the same spot where you met Clara, which I marked on the map above.

Once there, pick up the paper on the wooden table to the right of the silver barrels.

You need to move the crate on the top shelf from the left over to the middle shelf on the right. You can see this in the picture above. After moving the crates to the correct locations, you will be rewarded with the third Bountiful Treasure Chest.
Treasure Hunt on the Battlefield – Silvermane Guard Restricted Zone

Related: Honkai Star Rail: All Administrative District Treasure Chest Locations
First, you need to teleport to the Frontline space anchor point.

Once there, pick up the paper that is pinned to the wall.

You need to make sure all Weapon Racks have 3 guns each

Once every Weapon Rack has three guns, you will be rewarded with the last Bountiful Treasure Chest.

After opening the fourth Bountiful Treasure Chest, you will be rewarded with The Fourth Little Mole and The Tale of Moles achievements.
Back to Boulder Town

After completing the objectives in all three areas, return to Julian in Boulder Town and progress through the dialogue.
Related: All Hide-and-Seek Locations in Honkai: Star Rail
Give to Nika – Administrative District

Travel to the Administrative District using the Central Plaza space anchor point.

Give the pages you found to Nika.

After finishing the dialogue with Nika you will finish The Adventurous Moles mission.
Since you have now completed the mission you will be able to get back to ascending characters happily and working through any other quests you’d like to complete. Time to hop back into the incredible world on offer.


Published: Nov 6, 2023 04:16 am