Elden Ring does little to guide you through your adventure in the Lands Between. You fight against a seemingly impossible boss, get a small optional tutorial, and now you’re out and about. The moment you explore, you’re facing yet another seemingly unbeatable boss, the Tree Sentinel. This posed the question, what is the best way to go? Here, we’ll guide you through the best progression route in Elden Ring like the boss order and places to check out.
Best Elden Ring Progression Route and Boss Order

For true first-timers of the Soulslike games, always pick the Golden Seed for your Keepsake! This will give you an extra permanent heal at the start of the game. Since you have free reign on where to go in the Lands Between, follow this guide’s arrows as just the best route for Elden Ring.
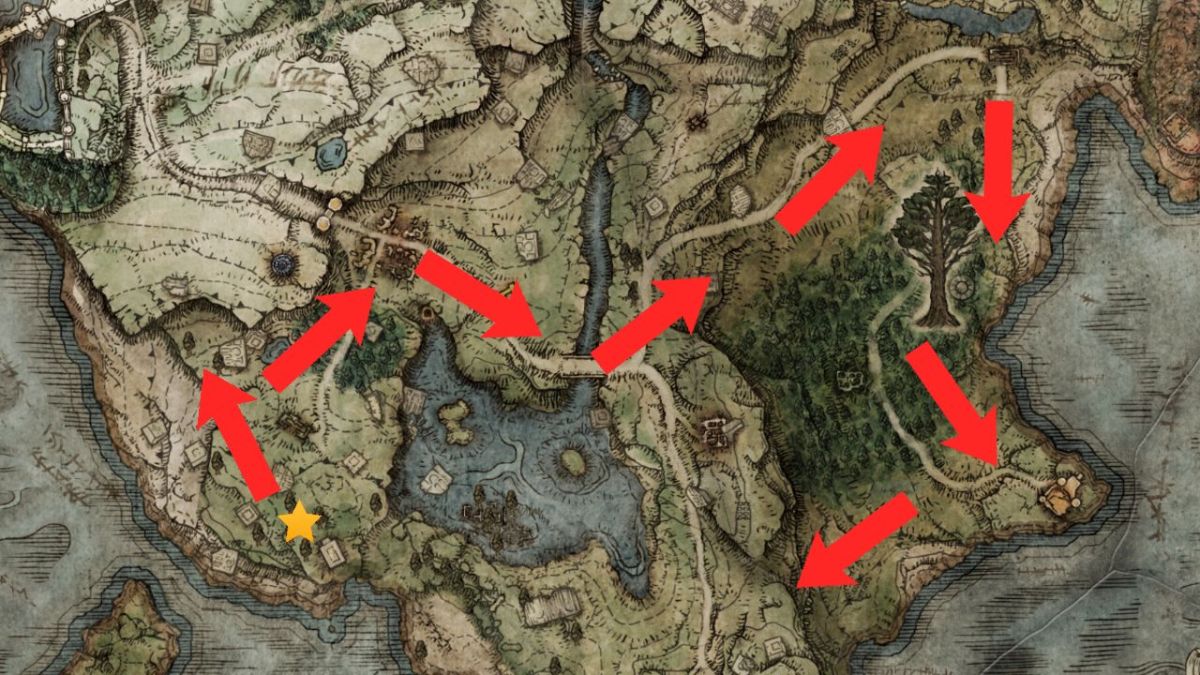
Once you make it to The First Step, skip the Tree Sentinel. It’s possible to beat everything in the game with level 1 gear, but if you want to deal decent damage and be able to take more than one hit, move on. The following map will show you the places you should go to defeat bosses, gain XP, and acquire new weapons for your journey ahead. Fighting Agheel is optional since Dragon bosses in the game tend to be clunky and tedious.

Next, as you clear most of the central part of Limgrave, head south past Agheel Lake South and Bloodhound Knight Darriwil’s Evergaol. Go south until you hit the Bridge of Sacrifice. Next, you want to clear as much as you can in this area. For additional drops and XP, patrol the Castle Morne Rampart Site of Grace at night to fight the Night’s Cavalry. There should be 10 bosses in this area you can take down, including Leonine Misbegotten at Castle Morne.
Once you have explored a majority of Limgrave, you can then proceed towards Stormveil Castle to fight Margit. Of course, to fully maximize your stats without hitting diminishing returns on XP gains, you can revisit skipped field bosses like the Tree Sentinel and Flying Dragon Agheel.
The next hurdle is getting through Stormveil without getting lost or running out of Crimson Flasks. Since that might be harder than Margit, you can start to travel eastward towards Caelid. Don’t stay for long, but try unlocking new Sites of Grace. Hit up a few dungeons and find additional Golden Seeds to up your flask count.

The area labeled “early game farm” is good for getting a few extra levels so you can get through Stormveil and eventually get through the second story boss of the game, Godrick the Grafted. While you’re farming here at the northeast side of Caelid, find the Farum Greatbridge Site of Grace so you can come back there to defeat Black Blade Kindred and Flying Dragon Greyll at a later time.
If you followed the route up to this point, you should probably be nearing level 70, which will be more than enough to find your way through Stormveil, beat Godrick, and get to the next area of the game, Liurnia.
This place is just as densely packed as the last two regions, but you want to start with the outskirts. Hug the left or right of the area. Don’t take the lake routes here, given that there isn’t anything too significant other than Sites of Grace and collectibles. Travel to as many named places until you get to Caria Manor on the left and the Church of Inhibition on the right.
All this side questing will help you gain additional levels, upgrading materials, armor, and more important items to help you survive. At this point, you can then clear out Raya Lucaria without too much trouble, including the boss.

This allows you to move forward onto the Altus Plateau. Here is where you want to start with the western part and slowly make your way to the east. While you can use the Grand Lift of Dectus to make your way there, it’ll be easier to go through the Ruin-Strewn Precipice where you fight Magma Wyrm Makar. It’s an alternate route so you can reach places like Volcano Manor. While this area and quest are optional, they’ll help level you tremendously if you want to go for a completionist run.
Once you clear all or most of the area off the outer wall of Leyndell, you can revisit Caelid. Even though this place is technically available from the start, the enemies hit very hard. If you’re all the way at the Royal Capital, you are most than equipped to take on most of the threats looming in the red wastelands, including one of the more notoriously difficult bosses, Radahn.

If you decided to clear all or most of Caelid, including Redmane, the War-Dead Catacombs, the Divine Tower, the Bestial Sanctum, and all the dragons, most of the other fights in the game should be significantly easier.
At this point in the game, everything is a lot more straightforward, especially with where the Sites of Grace are pointing. Leyndell is the last place in the game where you can easily get lost because of its depth. You might end up in the sewers or making your way to the top, getting that much closer to the Erdtree sealing the Elden Throne. Here, you only have to fight Godfrey and Morgott so you can progress toward the Mountaintops of the Giants.
That whole upper section of the map that seems inaccessible to the east of Castle Sol is all optional. It’s accessible if you get both pieces of the Haligree Medallion. Anyway, this snowy section of the map will feel like Caelid again. Everything hits hard, plus visibility is low.

It is recommended to hit all the dungeons and caves. Levels matter greatly, especially for the fight ahead. The arrows will show you a path where you need to go, but feel free to grab any additional farming XP along the way. The only real mandatory boss here is the Fire Giant so you can move forward with the story.
At this point, you should go back to Leyndell and pick up any items you see on the floor since there are quite a few missable here. Once you’re done, proceed with the Cardinal Sin scene and get to Farum Azula. At this point, everything here is straightforward as this is the last mandatory and unique place to beat the story.
The reason why underground areas of the game are excluded from the guide is that they’re all mostly from optional quests. Of course, if you’re looking to explore every area before the credits roll, you want to explore them.

Of course, this route which we consider the best for Elden Ring is that it allows you to mostly hit all the important areas, including any possibly missable things. If anything, it’s more to point you in the direction of useful items and powerful enemies.
Elden Ring Boss Order
The following is simply a list of the mandatory bosses you should fight before getting to the final boss. This does not include bosses from catacombs, invasions, or dungeons.
- 1. Margit the Fell Omen
- 2. Godrick the Grafted
- 3. Rennala, Queen of the Full Moon
- 4. Godfrey, First Elden Lord (Shade)
- 5. Morgott, the Omen King
- 6. Fire Giant
- 7. Godskin Duo
- 8. Maliketh, the Black Blade
- 9. Godfrey / Hoarah Loux
- 10. Radagon of the Golden Order / Elden Beast
What you may notice is that other shard bearer bosses like Mohg, Malenia, and Rykard are missing from the mandatory ones. They aren’t necessary. While they all add to the lore and give cool drops, only the above are those needed to get through the game. Of course, with more bosses defeated and more places explored, you can even the playing field having stronger stats so you won’t always get one-shotted by everything that comes your way.
Elden Ring is out now for PlayStation 4 and 5, Xbox One and Series consoles, and PC.


Published: Jul 5, 2022 06:49 pm